Tel2 Voicemail puts you in control of setting up and accessing your messages from anywhere. Our standard voicemail features include personal recordings for BUSY and UNAVAILABLE, save, delete, forward and the ability to deliver via email and use SMS for notifications (charges apply).
You can check your voicemail from any Tel2 phone line by simply dialing *55 on your handset. If you wish to check your voicemail externally from a non-Tel2 phone then you can dial:
+44-203-670-9996 (or 0203-670-9996 inside the UK)
You will be prompted for your phone number (which should be in 44xxx format) and then your PIN code. Before you can do this however you will need to assign yourself a PIN number in our customer portal at:
https://now.tel2.co.uk/pabxprefs/settings/inbound-calls/voicemail.
Simply login with your Tel2 phone line and then assign a PIN code in the 'Voicemail PIN number:' field. You can also forward voicemails to an email address and setup other options in this page.
Other Voicemail Features:
Quick Guide
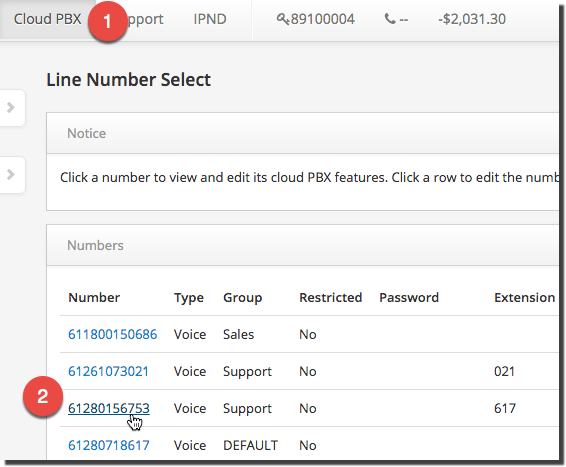
Step 1: Login to CloudPBX Portal
- Log into Tel2 Now at https://now.tel2.co.uk
- CloudPBX > Select hyperlink DID (eg 442034567890)
- Inbound Calls > Voicemail Service
- NB – We recommend writing a script and rehearsing before recording any CloudPBX messenging.
Step 2: Recording your VM
- Click to Record: Click either the UNAVAILABLE or BUSY functions and enter your phone number. Tel2 will phone you back and prompt you to record your message. Once you have recorded your voicemail, follow the prompts to confirm the message or start afresh.
- Media Upload: For higher quality recordings for Voicemail UNAVAILABLE or BUSY (as well as Auto Attendant, Music on Hold, and Caller Tunes) you can upload your MP3 recordings using the Cloud PBX Media Section.
Step 3: VM Access and Delivery
- Accessing your Voicemail box: You can access your own inbox by dialling *55.
- Voicemail PIN number: To access to your voicemail from phone not directly linked to your message box requires a PIN code (see Voicemail PIN number). To access that box enter *55 at anytime during the message. You will be greeted by the message……”please enter your password followed by the # key”
- Trusted Callers: Create a trusted caller number list to avoid the extra step of entering a Voicemail PIN code. To access that box enter *55 at anytime during the message. Because your number is on the Trusted callers list you will not be challenged for a PIN code.
- Call Diversion Timer: Sets the seconds to wait before diverting to voicemail or forwarding.
- Email: Enter the email address where you want your voicemail messages delivered.
- SMS: Send and SMS alerts to let you know you have a new voicemail. Note each SMS will cost 20 cents.
- From a Tel2 Phone: Dial *55 from your Tel2 phone to access your personal mailbox.
Feature Keys
- 4 – previous message
- 5 – Repeat
- 6 – Play next message
- 7 – Delete
- 8 – Forward
- 9 – SAVE
- Voicemail Star Access: Dial your own Tel2 number from any phone and wait for it to go to voicemail then press *55 and you will be prompted for your PIN code (this must already be setup) followed by # to access your mailbox messages as normal. You can also setup calling numbers as trusted callers to avoid having to enter a PIN number.
- From Tel2: You can check your new voicemails by simply logging into Tel2 and clicking on the messages tab. (You cannot setup prompts etc. using the web interface however).
- From email: You can login to Tel2 and under voicemail settings setup an email address to forward all voicemail messages onto. For the technically minded Subscribers you can also connect to our IMAP server (mail.cloud2tel.co.uk) and check your voicemail directly from your email client such as Outlook.
Step 4: Disable Voicemail
Disable Voicemail
- Log into https://now.tel2.co.uk
- Select CloudPBX > Inbound Calls > Voicemail Service
- Click the checkbox Turn off your Voice-mail call diversions

5. YouTube – Managing Voicemail
6. Managing After hours Voicemail
To setup an after hours Voicemail you will need to configure a Call Forward and secondly your Time Schedules (under Cloud PBX, Preferences) to define your office work hours.