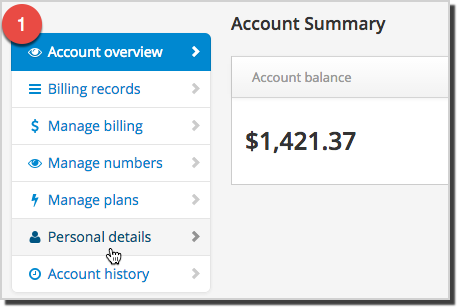
Your Bill Anniversary Date is the date you first signed up for Tel2. Your monthly bill cycle is based on this day. For example if you signed up on the 20 March then the 20th of each subsequent month will be your Bill Anniversary.
Author: Support Last update: 2016-05-28 00:21
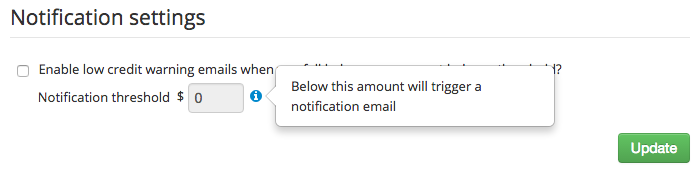
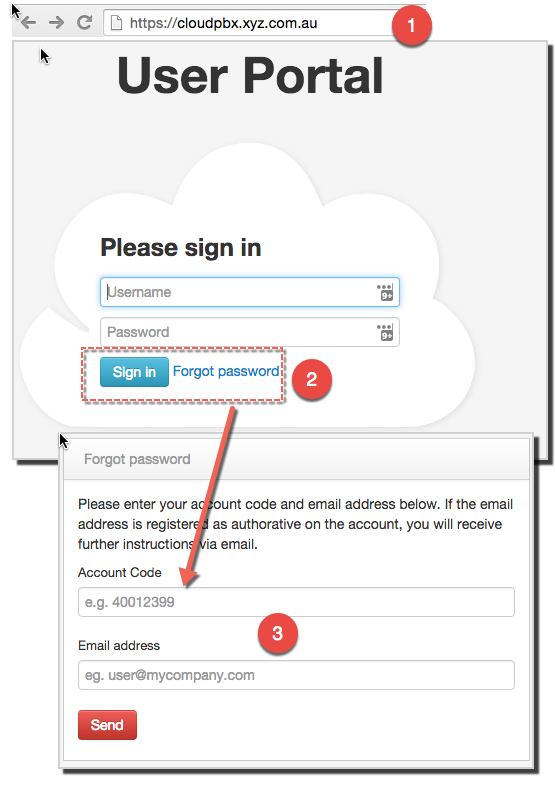
Account Notification Settings
Account Notification Settings
Our Account notification feature helps you keep on top of your accounts balances with a variety of low account credit notifications. Customise your individual thresholds such as minutes remaining, dollars remaining.
Click Enable low credit warning emails, if you wish to enable this function.
Add Notification threshold amount- when your account drops below this amount you will be sent an email notifying you. If you leave it at £0.00 your threshold has no limit.
Click Update to save settings.
Author: Support Last update: 2016-05-28 00:22
Billing Records (CDR)
Billing Records (CDR)
You have the ability to search through all your Call Data Records (CDR) billing records, and you can refine your search by; date calls where made, billing period, length and type of call.
Set parameters; calls made before/after, billing period and billing group.
Click Save or Export CSV for billing records.
Note: Use Advance search to tighten your search, to make it easier to find particular billed calls.
CloudPBX CDR records include the following information:
Account code
A Party (Calling Party)
B Party (Called Party)
Channel used
Destination channe
Last application
Call start time
Call answer time
Call end time
Call duration
Bill seconds
Call result
Diverting number
Unique id for call
Hang up
CDRs can be used to generate AMA billing records.
Author: Support Last update: 2016-05-29 00:10
Does Tel2 Invoice monthly?
Does Tel2 invoice monthly?
No. Tel2 does not invoice monthly as all services are prepaid. You will be emailed a receipt every time you add funds to your Tel2 account. Our service operates in much the same way as a prepaid mobile account.
To see a record of transactions for a bill period select the Account Overview option in the Tel2 Portal.
Is there an activation/setup fee to sign up for Tel2?
Is there an activation fee to sign up for Tel2?
No. For Tel2 calling plans and bundles you are not charged an activation or setup fee. You can sign-up, add calling credit and start using the service straight away.
Fees may apply however if you want to port an existing phone number from another provider over to Tel2. This depends on your plan type. This is a fee that Tel2 incur so we need to pass this onto the customer.
Author: Support Last update: 2016-05-29 07:57
Is there a contract term or cancellation fee if I join Tel2?
What is the contract term if I join Tel2?
For all Tel2 calling plans and bundles, these are on a month-by-month prepaid basis, so there is no contract term or any termination or cancellation fees.
All plans are prepaid a month in advance. If you do not use your plan or credit for the whole month there are no refunds of any prepaid balances.
Author: Support Last update: 2016-05-29 08:01
Billing CDR Feed Instructions
Billing feed
Summary: Accessing call recordings.
Detail: Tel2 “Calls Records” are accessible from the moment of call completion and are available from the Tel2 Customer Portal.
Tel2 Portal
All billing, voice functionality, numbers management and connectivity options are managed from the Tel2 portal. Within the Billing Records section subscribers can view by day, line number and Call Type plus across the previous 12 months call activity.
If enabled, Call Records are discoverable as MP3 from within the Call Record interface.
Live API billing
Tel2 provide developers with a programmatic assess to retrieve CDR via a simple API (HTTP GET). The following URL and formatting provides access to the live billing fee.
fromid: tells the system from which id you wish to fetch rows (including that ID). Use fromid=1 initially to collect all CDR in the feed. (We keep around 60 days worth available on the feed)
Call Types
Type
Sub Type
Description
IB
IB
Inbound Calls
T2
T2
On-net calls
L
LO
Local Overage
IM
INM
TollFree Inbound Mobile
0
0
Pin Blocked Calls
A3
A3
AU 6113 Inbound Nat
A8
A8
Inbound AU 6118
U0
U0
Inbound UK 4480
U1
U1
Inbound US 18xx
3M
3M
AU 6113 Inbound Mob
9
9
0900 Calls
I
I
International Calls
IS
IN8
TollFree Inbound
M
M
Calls to Mobile
L
L
Local Calls
S
S
National Calls
8
8
Toll free calls
O
O
Operator Calls
SM
SM
SMS
M
MG
Calls to Mobile GSM
M
M3
Calls to Mobile 3G
IF
IF
Inbound Forwarded
Author: Support Last update: 2017-10-01 00:16
Billing Questions » Credit Card Payments
Adding Credit using a Credit Card
Adding Credit
Adding credit to your account is easy. You can save your credit card information with in the Portal, to make making a payment even easier.
Add credit card details or select a saved card in the pop up.
Click Accept to make payment.
By setting up automatic top ups to your account you can be rest assured you will always be in credit.
Author: Support Last update: 2016-05-28 00:15
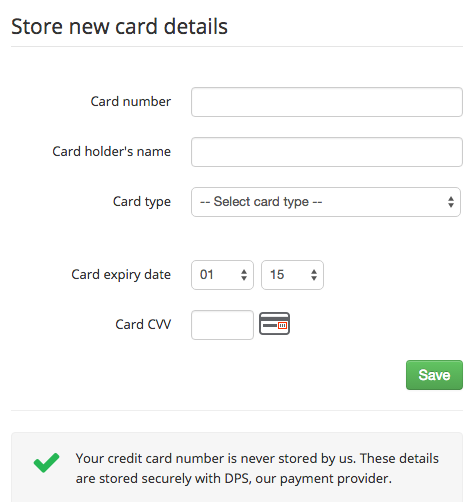
Storing a Credit Card for Automatic Payments
Store Credit Card
Store your credit card information within our portal to make topping up your account easier. By doing this you can also set up the auto topup settings.
Click Save to update and store securely your credit card details.
Author: Support Last update: 2016-05-28 00:16
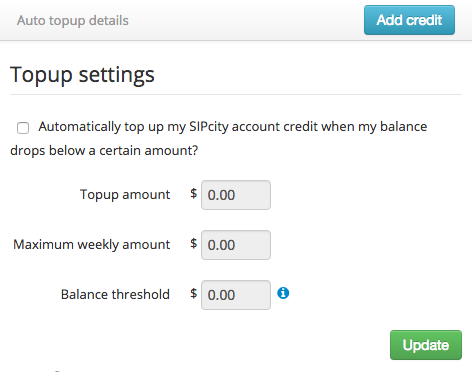
Automatic Top Up using a Credit Card
Automatic Top Up
Setting up auto top up functions gives you the ability to have control over your billing account. Using Tel2 you have four functions that you can enable to make sure you are always on top of your account.
Top Up settings: You can have your account automatically toped up when your balance drops below your nominated top-up level (e.g. £50). At the end of your billing month we’ll top-up your account to the nominated top-up level, so you start each billing month with the nominated balance.
Notification Settings: You can have an email sent to you when your account falls below the threshold.
Auto debit: You can have you card charged for the recurring monthly charges.
Stored credit card information: Securely register your credit card details and nominate a top-up level (e.g. £50). Whenever your call credit drops below £5.00 we’ll top-up your account to the nominated top-up level, so you never run out of credit.
Add; Top up- amount,this is the amount that your account will get top up at each time an automatic top up occurs.
Click Update to save settings.
Step 2: Notification settings
Click Enable low credit warning emails, if you wish to enable this function.
Add Notification threshold amount- when your account drops below this amount you will be sent an email notifying you. If you leave it at £0.00 your threshold has no limit.
Click Update to save settings.
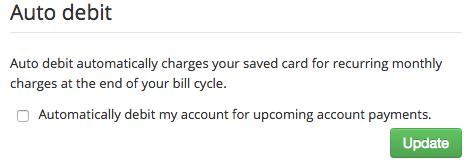
Step 3: Auto Debit
Click Automatically debit my account for upcoming account payments, if you wish to enable this setting.
Click Save to save settings.
Author: Support Last update: 2016-05-28 00:20
Technical Questions
Ports and Hostnames
Ports and Hostnames
DNS Settings
Proxy
phone.tel2.co.uk
TCP/TLS Proxy
phone.tel2.co.uk (port 5061)
SIP Peering IP Address
27.111.15.65
Other
Our RTP Port Range
30000-40000
Our T.38 (faxing) UDPTL Port Range
40000-50000
Fax
fax.tel2.co.uk
Primary NTP
uk.pool.ntp.org
SIP (UDP/TCP)
5060
SIP TLS proxy
5061 (phone.tel2.co.uk)
If using TLS verify whether your PBX or IP phone requires a TLS flag to be set as transport.
Author: Support Last update: 2016-05-29 00:40
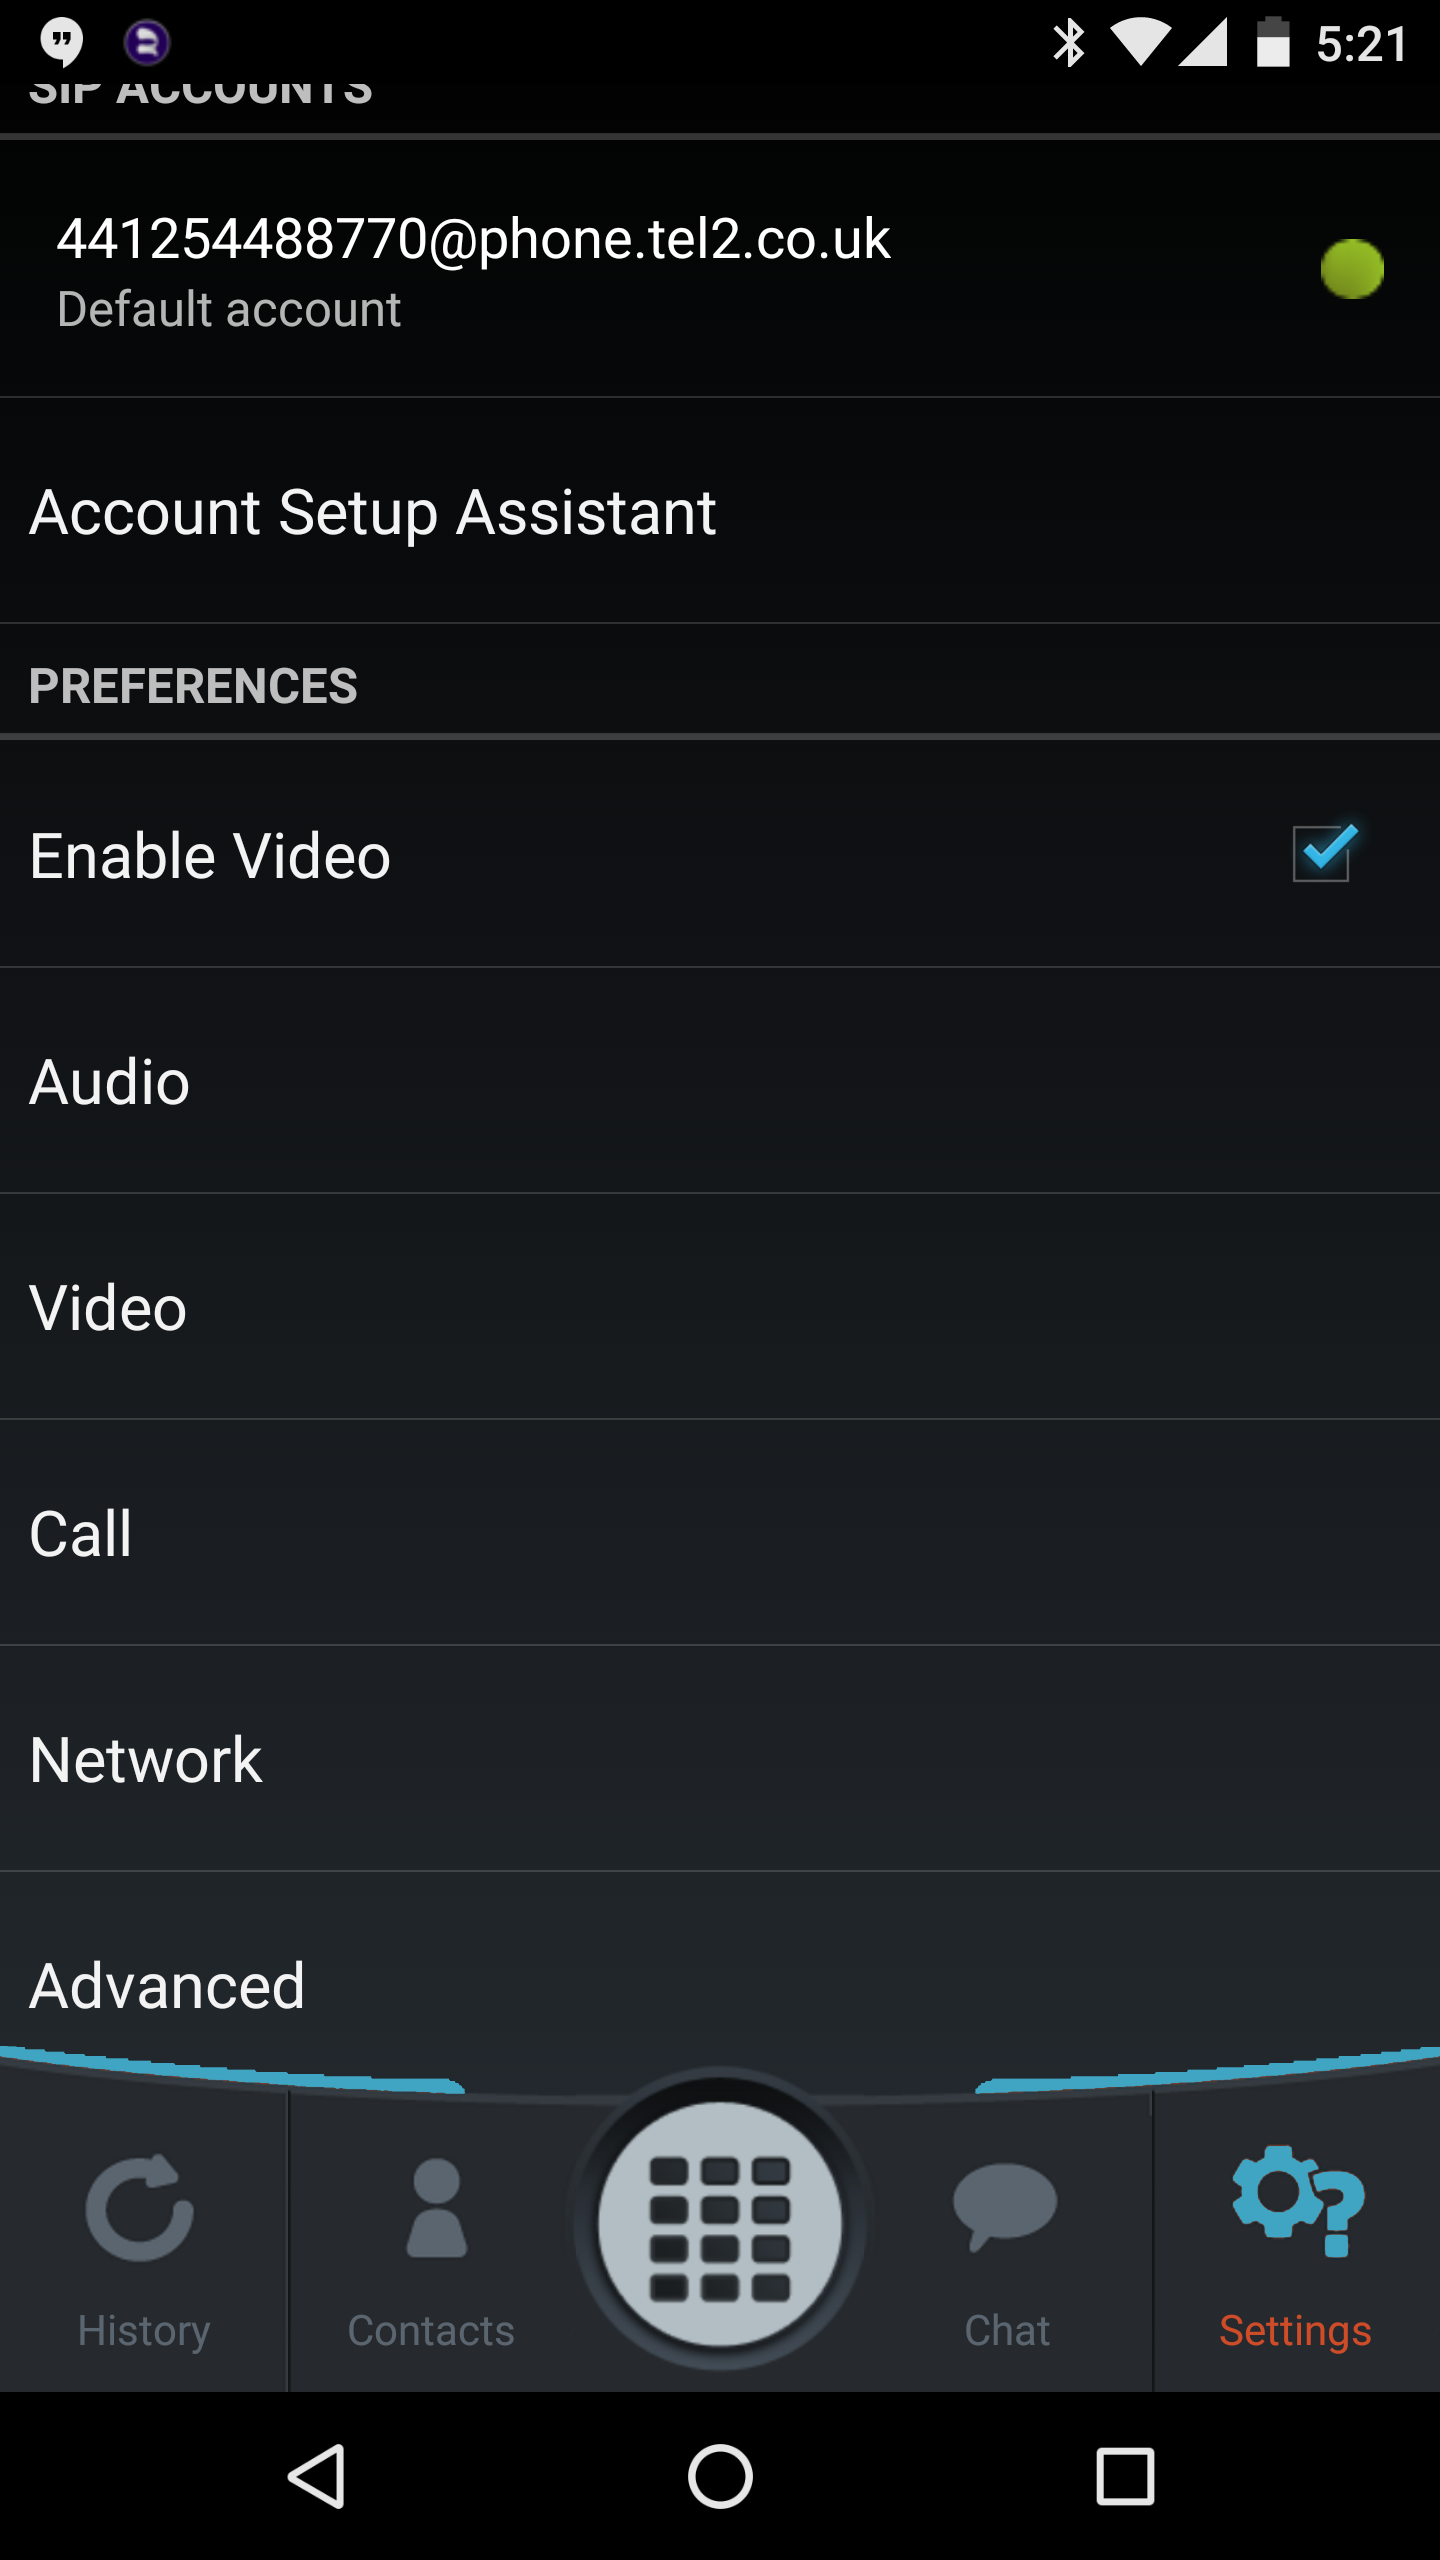
What Codecs do Tel2 Support?
Codec Support
Voice: G.722 (wideband), G.711 A Law, G.711 U Law, GSM, iLBC, G.729 and G.726 with automatic transcoding between codecs.
Video: H.264 and H.263.
Fax: T.38 pass-through and termination (Redundancy Mode)
Select CloudPBX > Phone number > Preferences > Voice and Quality
Set preferences
Set Codecs (recommended SysAdmins only)
Set DTMF (recommended SysAdmins only)
Author: Support Last update: 2016-05-29 00:42
NAT and SIP ALG
NAT
NAT Traversal
NAT can interfere with SIP and RTP by changing the ports on the way through. To counter we enable NAT traversal by default therefore communicating directly to the port that sent us the original RTP traffic (instead of sending back to the RTP port in the SIP message). For SIP registrations therefore you should normally disregard any IP address and ports shown in the SIP message as in reality they are rarely the ones used.
Firewall Behind NAT
You can generally disable firewall rules if behind NAT as they they shouldn’t be required. However, if port forwarding [SIP and RTP] selecting an appropriate RTP range can be complicated. In this scenario you may need to disable NAT.
SIP ALG
For incoming calls, if you’re users are reporting ringing with no voice on answer you’ve probably encountered a SIP ALG issue on your router. See our guide on Disabling SIP ALG on various brands of router.
If you are unable to access the router and therefore disable SIP ALG, consider switching your phone or PBX to TLS encryption (preventing SIP ALG) by changing the following two settings on your handset or IP-PBX.
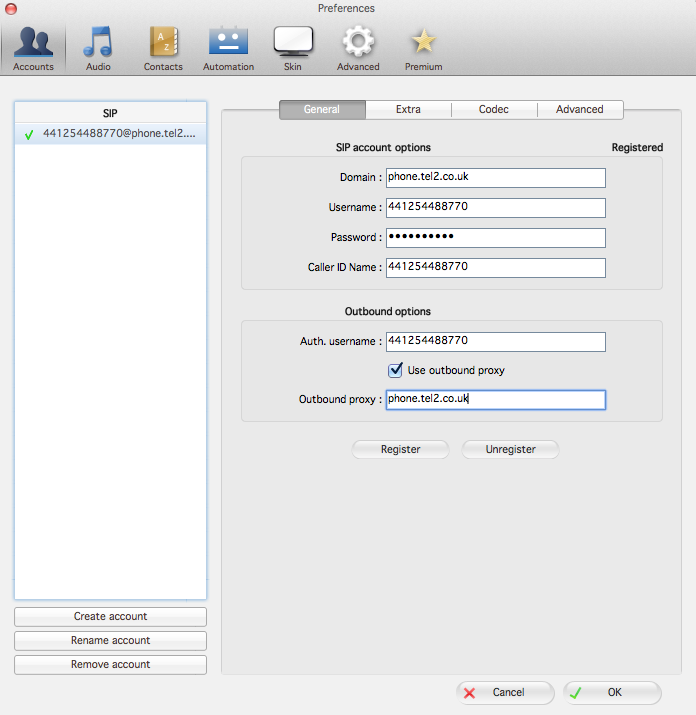
proxy: phone.tel2.co.uk
port: 5061
Transport: TLS
Author: Support Last update: 2016-05-29 00:46
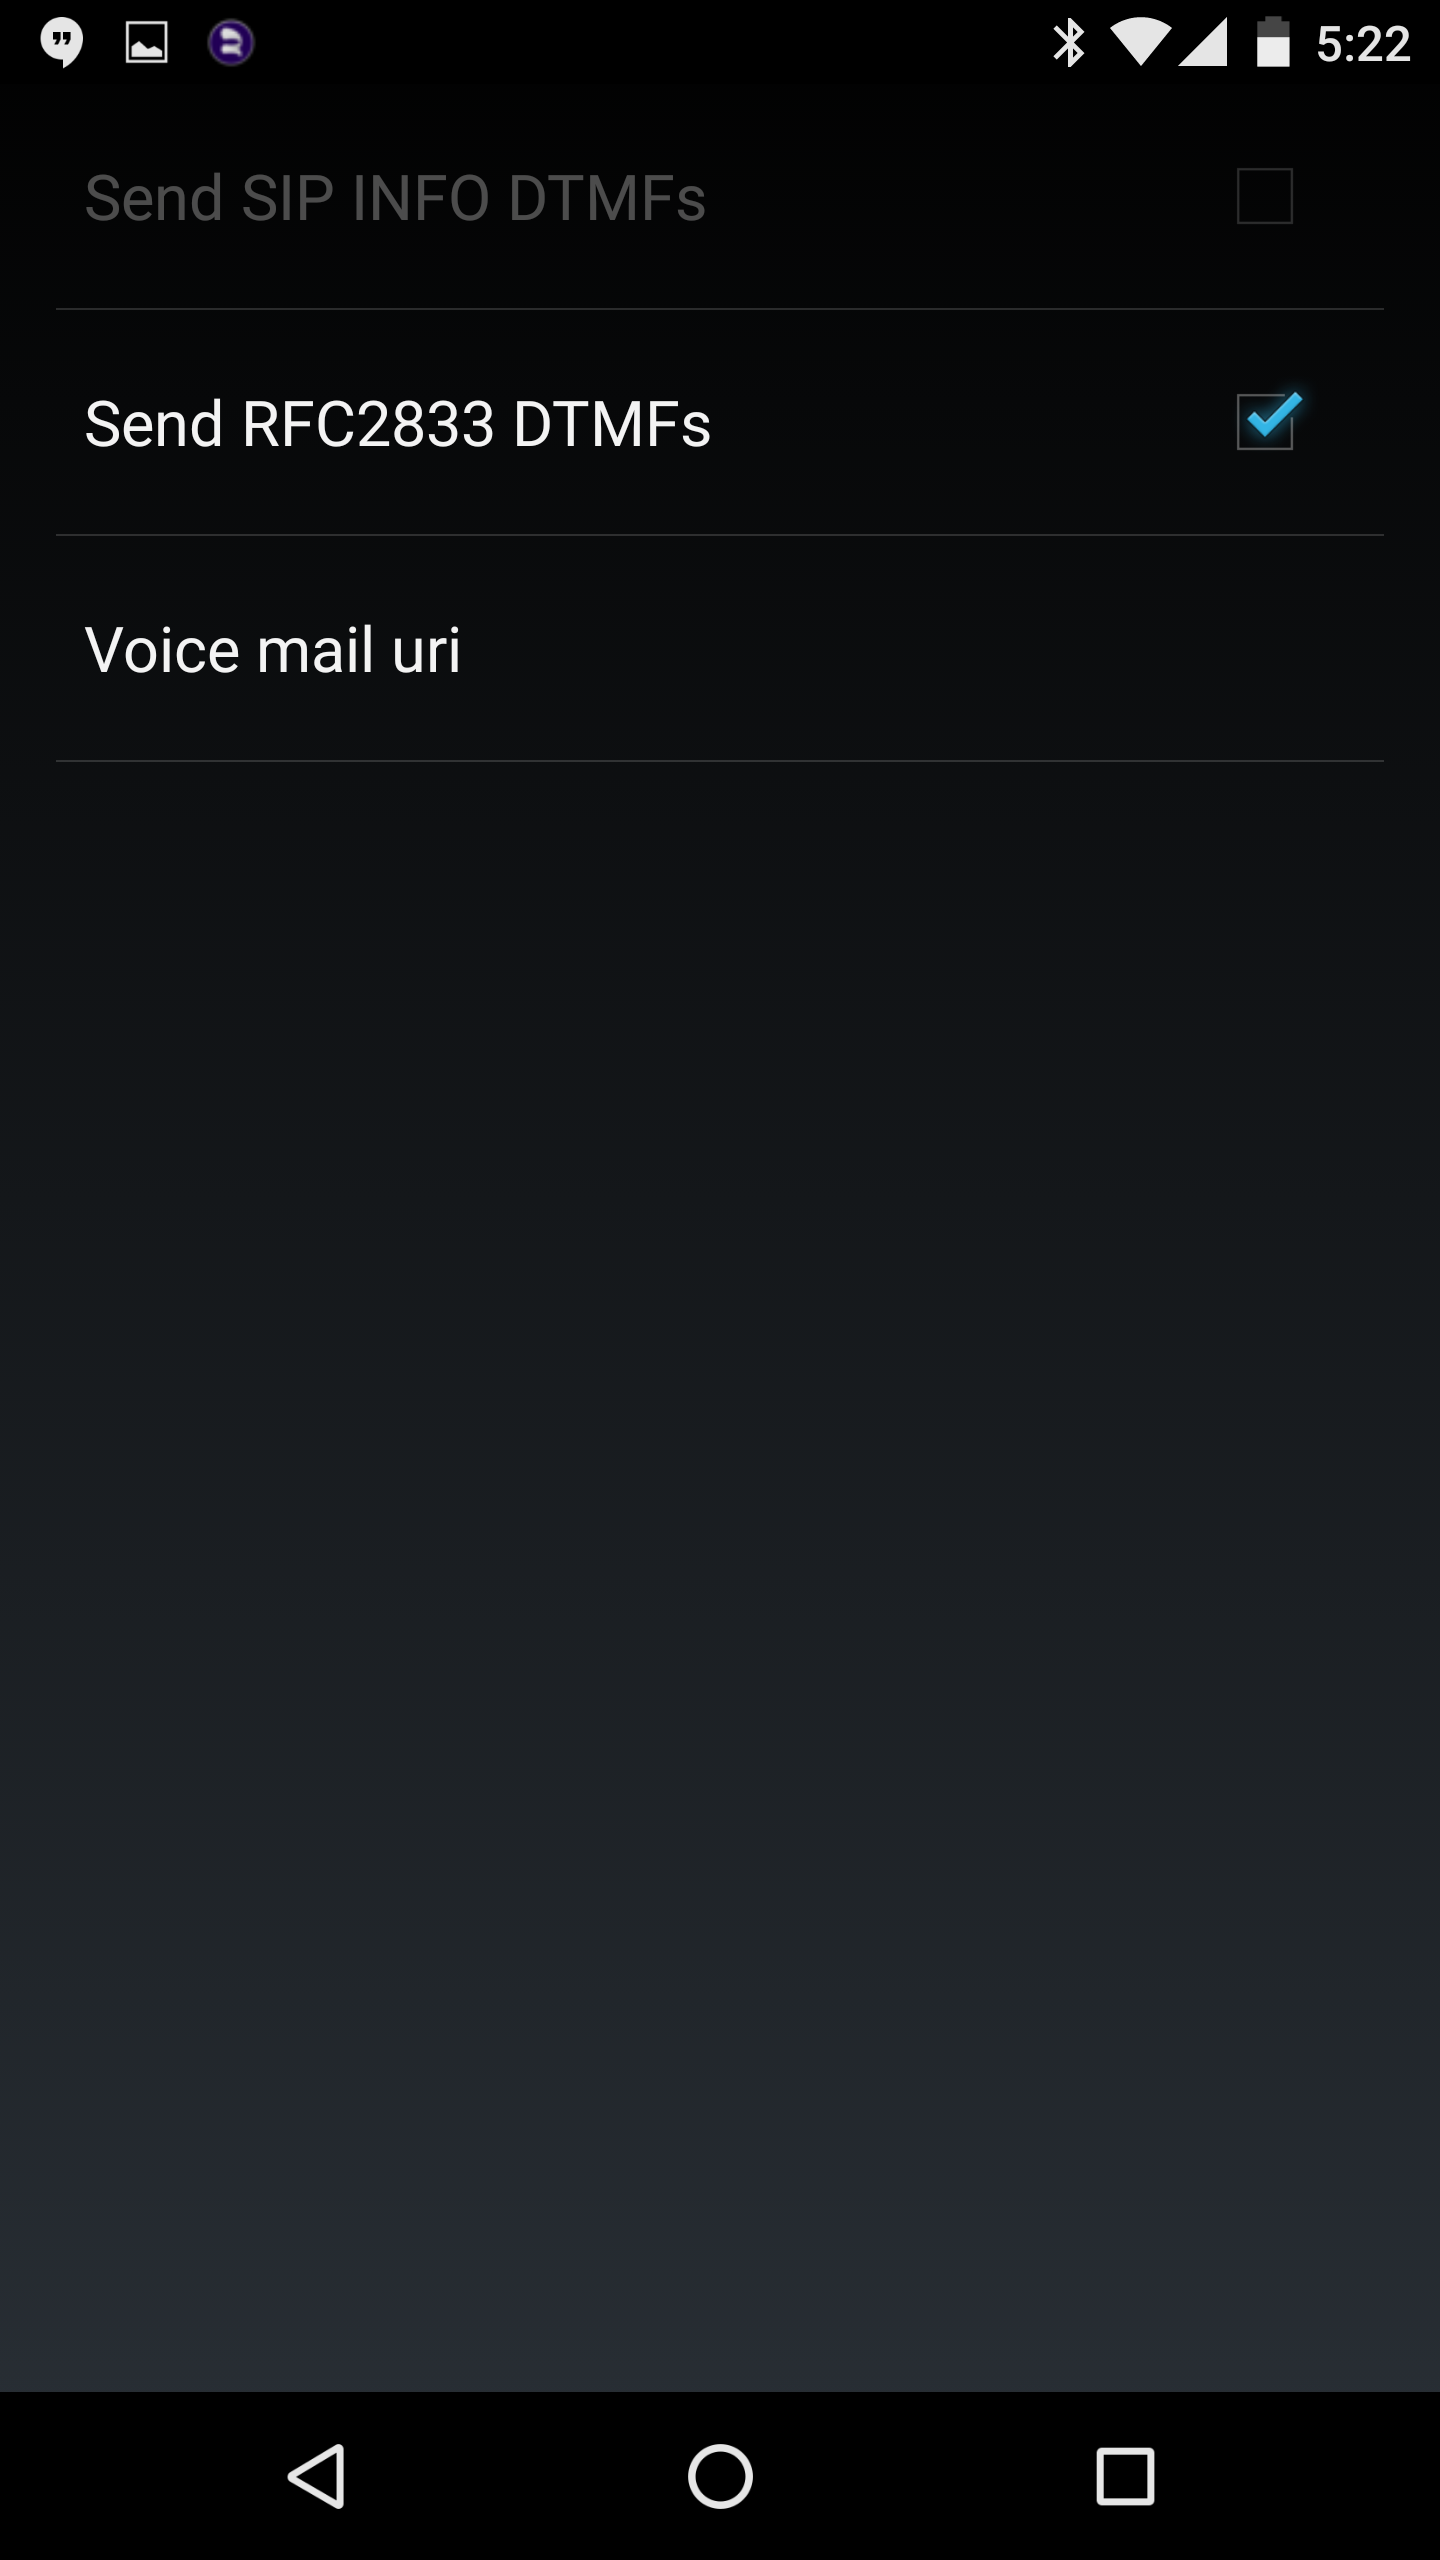
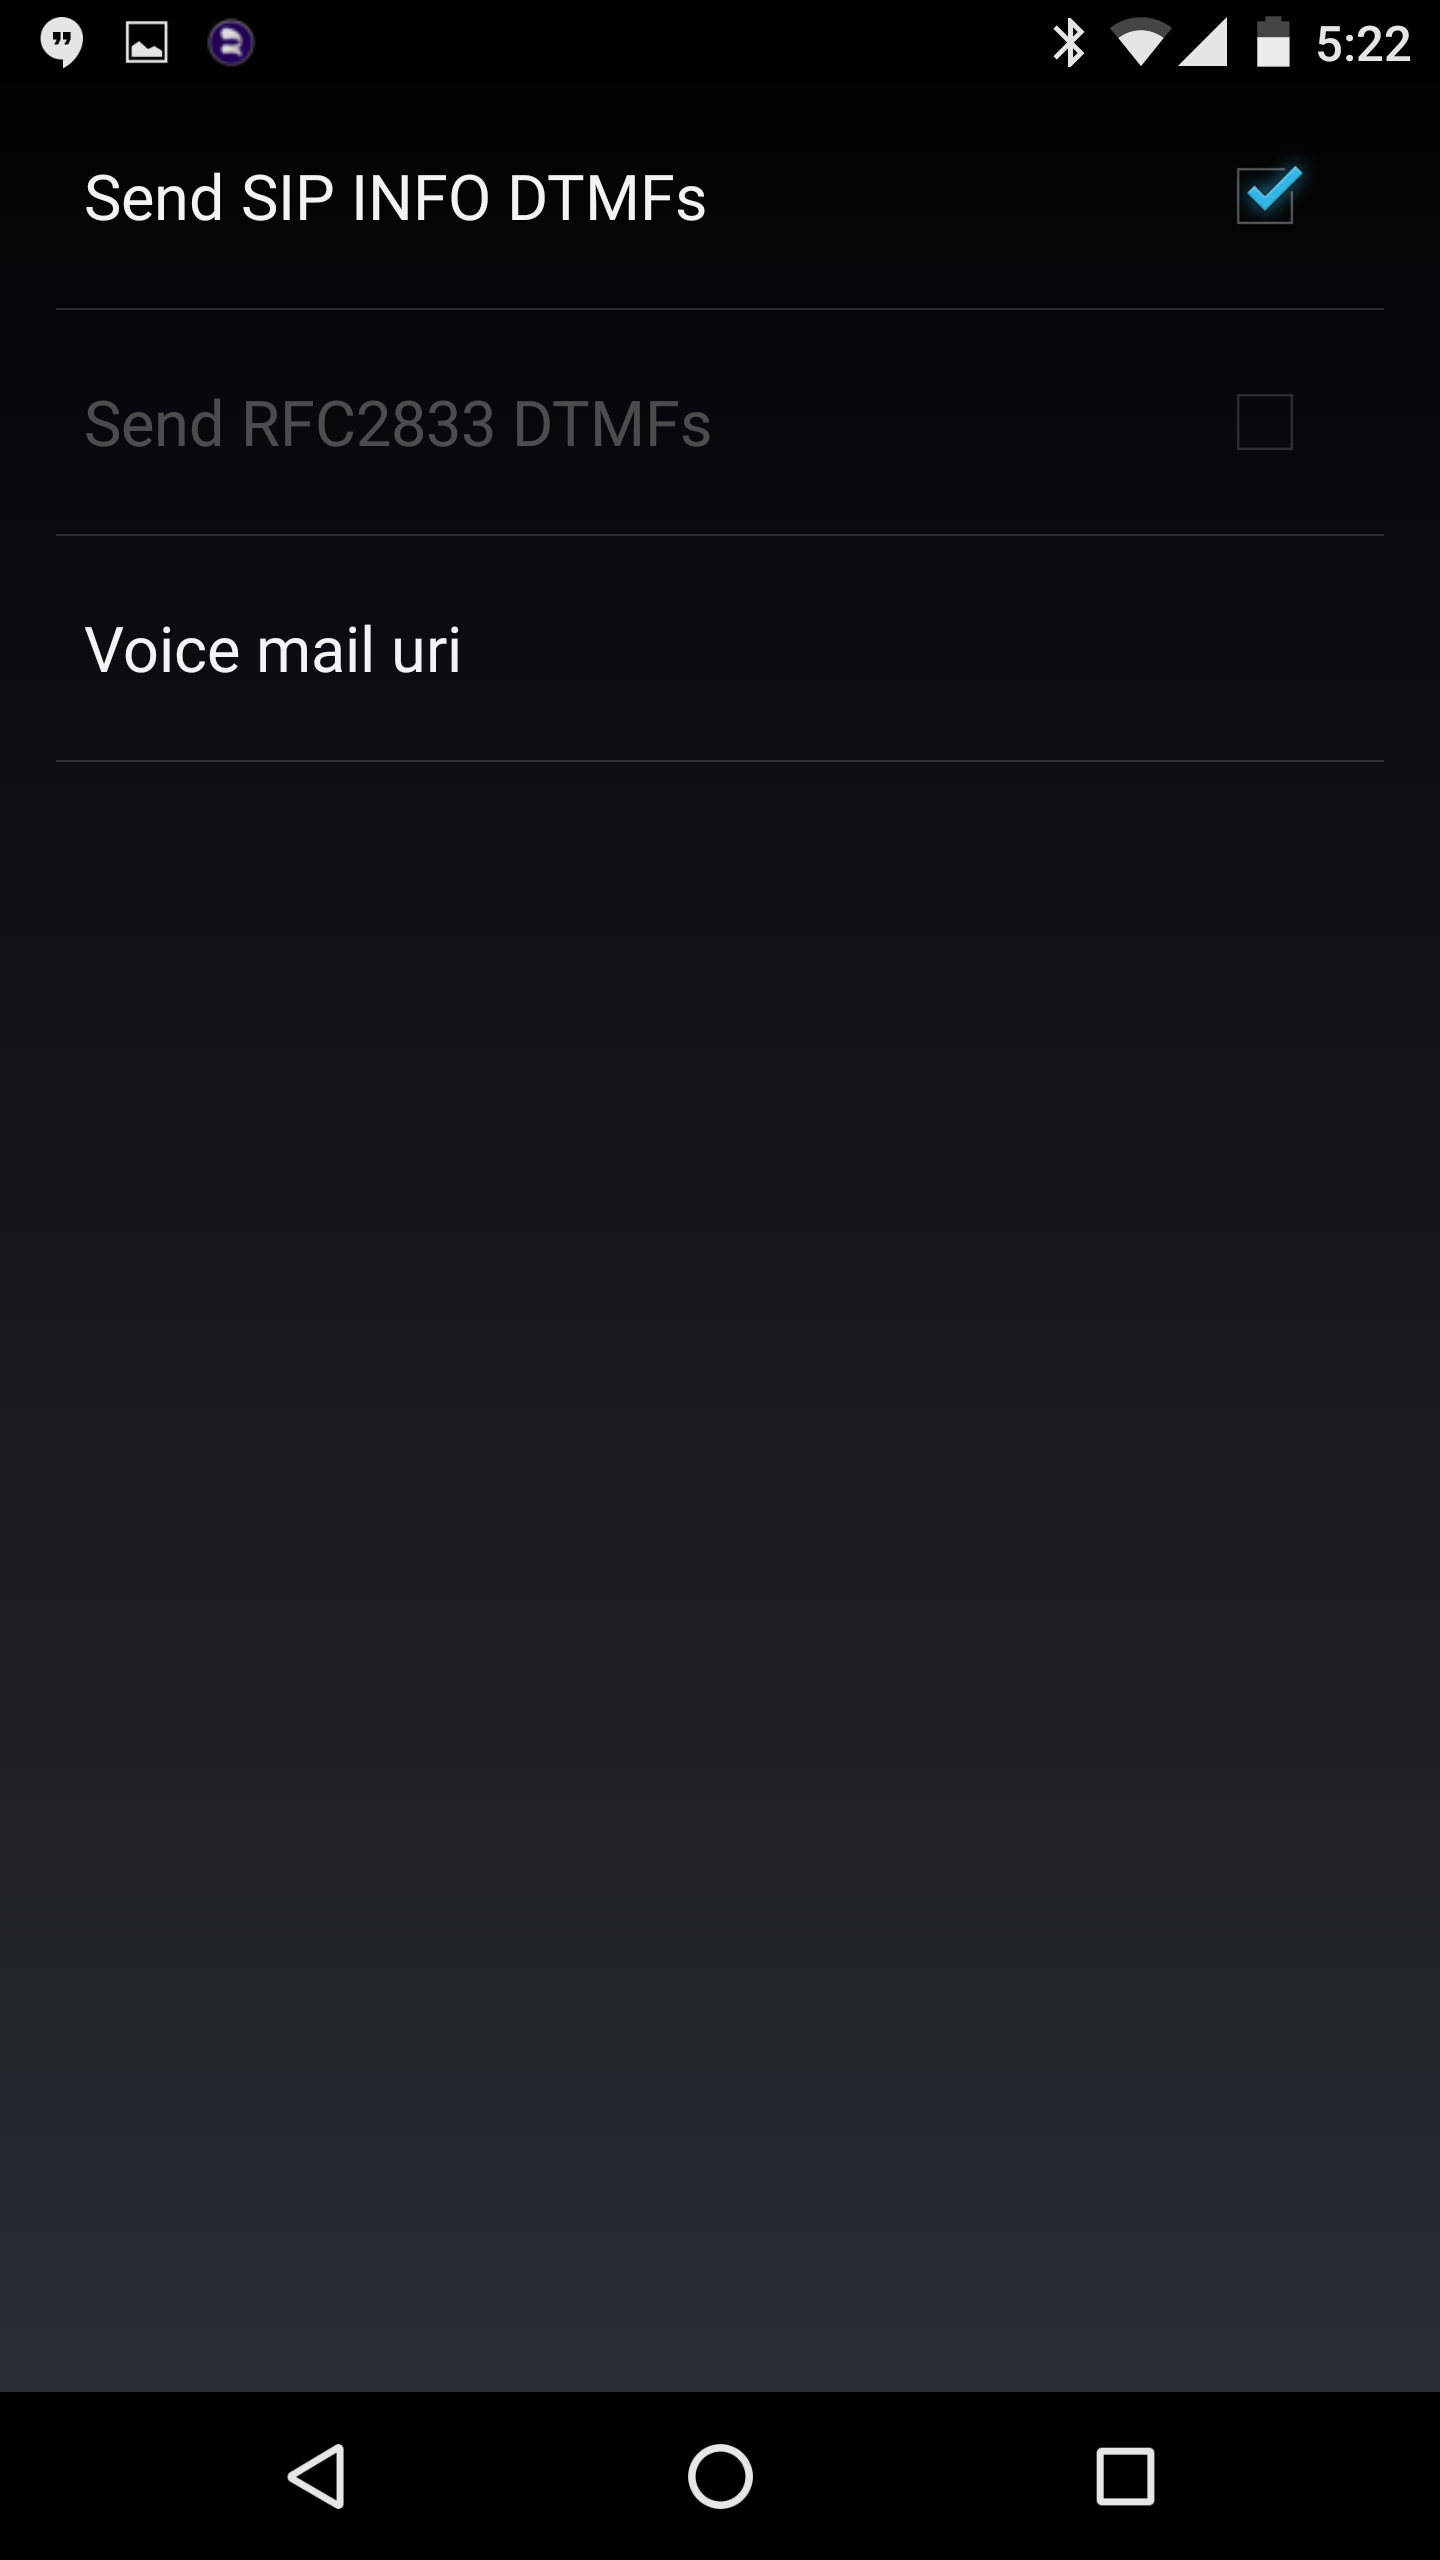
Problems with DTMF (Pressing digits during a call)
Problems with DTMF (Pressing digits during a call)
If you are reporting that your IVR is intermittently failing when pressing the menu selections of your Auto Attendant, it highly likely that the in-house PBX has a DTMF issue.
In summary, you’ll need to ensure you are supporting RFC2833 or SIP INFO and not the older analog Inband DTMF.
Inband: With Inband digits are passed along just like the rest of your voice as normal audio tones with no special coding or markers using the same codec as your voice. On a VoIP or SIP network Inband is highly unreliable and is usually the cause of failure.
RFC2833: (Preferred setting in most cases) Is a standards definition for signaling for various events including DTMF tones, fax-related tones and country-specific subscriber line tones.
SIP INFO: This method is also very reliable as it transmits each digit in a SIP message rather than in the audio/media portion of the call. Not all devices can support this method, but if you are having issues with RFC2833 then SIP INFO is a good alternative and should work well.
Author: Support Last update: 2016-05-29 00:48
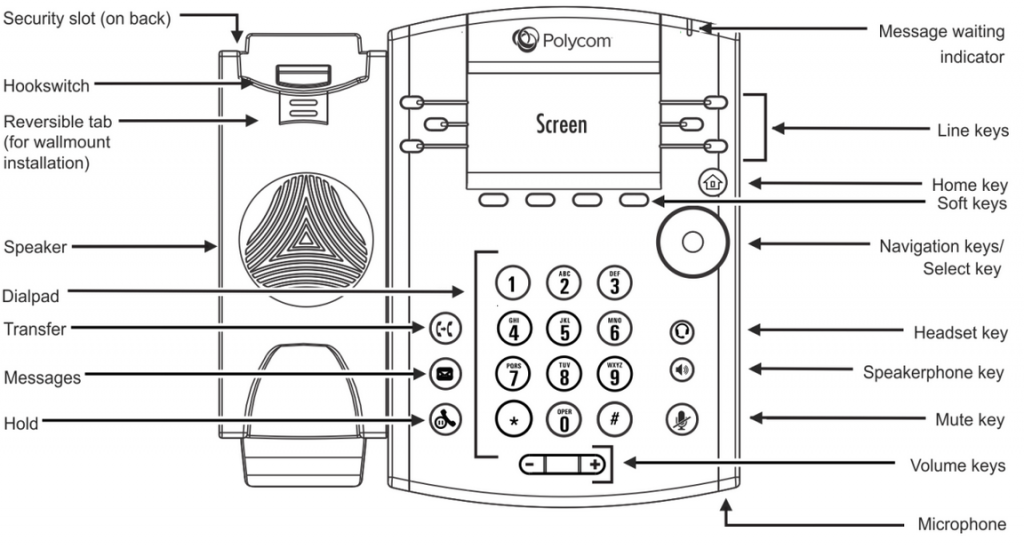
Can I use my existing phone with Tel2?
As a SIP or VoIP service provider you will require an IP telephone handset to make calls on the Tel2 network. Commonly used handsets are those by Yealink, Polycom and Cisco/Linksys.
You can connect a traditional analogue handset to our service but you will need something called an Analogue Telephone Adapter (ATA) first to convert the voice traffic to digital and the SIP protocol. There are various options for ATA's too such as Cisco SPA112 and SPA122 and many others. Contact support@tel2.co.uk if you need more assistance in choosing a handset or gateway device.
Author: Support Last update: 2016-05-29 04:57
Can I run my alarm systems across YourCloudPBX?
No.
While you may be able to get your alarm system working over our VOIP platforms we do not recommend this and recommend an IP based alarm system or one using a traditional analogue phone line.
Author: Support Last update: 2016-05-29 05:00
Can I use the Tel2 Cloud PBX if my on-premise PBX fails?
Can I use the Tel2 Cloud PBX if my on-premise PBX fails?
Yes, absolutely.
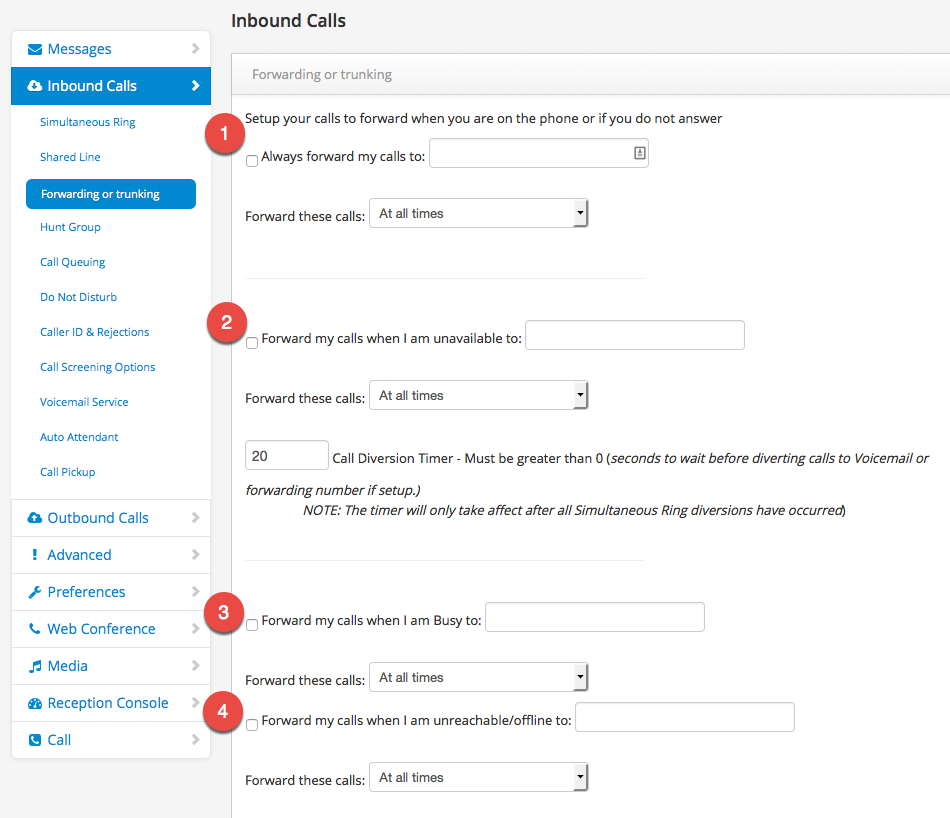
Location: CloudPBX > select number > Inbound Calls
Summary: Setting up a second layer of redundancy on your PBX.
Detail: Leverage our hosted cloud PBX voice service to provide your PBX with a second layer of redundancy, regardless of whether you are connecting via Peering or Registration.
Registration: Enable Call Forwarding to redirect to your specified alternate number(s) if the call isn’t answered within a designated time.
SIP Peering: If you don’t have a secondary IP/PBX, you can also enable Call Forwarding to redirect calls to alternate numbers. When our Active Polling service detects that your circuit has been off-line for more than 10 seconds, inbound calls will failover through to the alternates specified in your Call Forward.
Quick Guide
Step 1: Call forwarding
This service is only available to direct Inbound calls to alternate numbers in the event of a loss of data service. For a redundant path for Outbound calls speak to your PBX administrator about a basic rate ISDN or alternate data routes.
Set your Call Forwarding preferences including numbers and time schedules
Click Save to update your settings.
Author: Support Last update: 2016-05-29 05:01
Will my Tel2 service work if there is a power cut?
Will my Tel2 service work if there is a power cut?
Your Tel2 service requires power to work as your broadband modem will not function without it.
To ensure that you never lose inbound calls in the case of a power failure, we recommend that you set up call forward unreachable or simultaneous ring on at least one inbound number and have calls sent to a mobile. There are a number of alternative features that you can use also to ensure you always receive calls.
Author: Support Last update: 2016-05-29 05:04
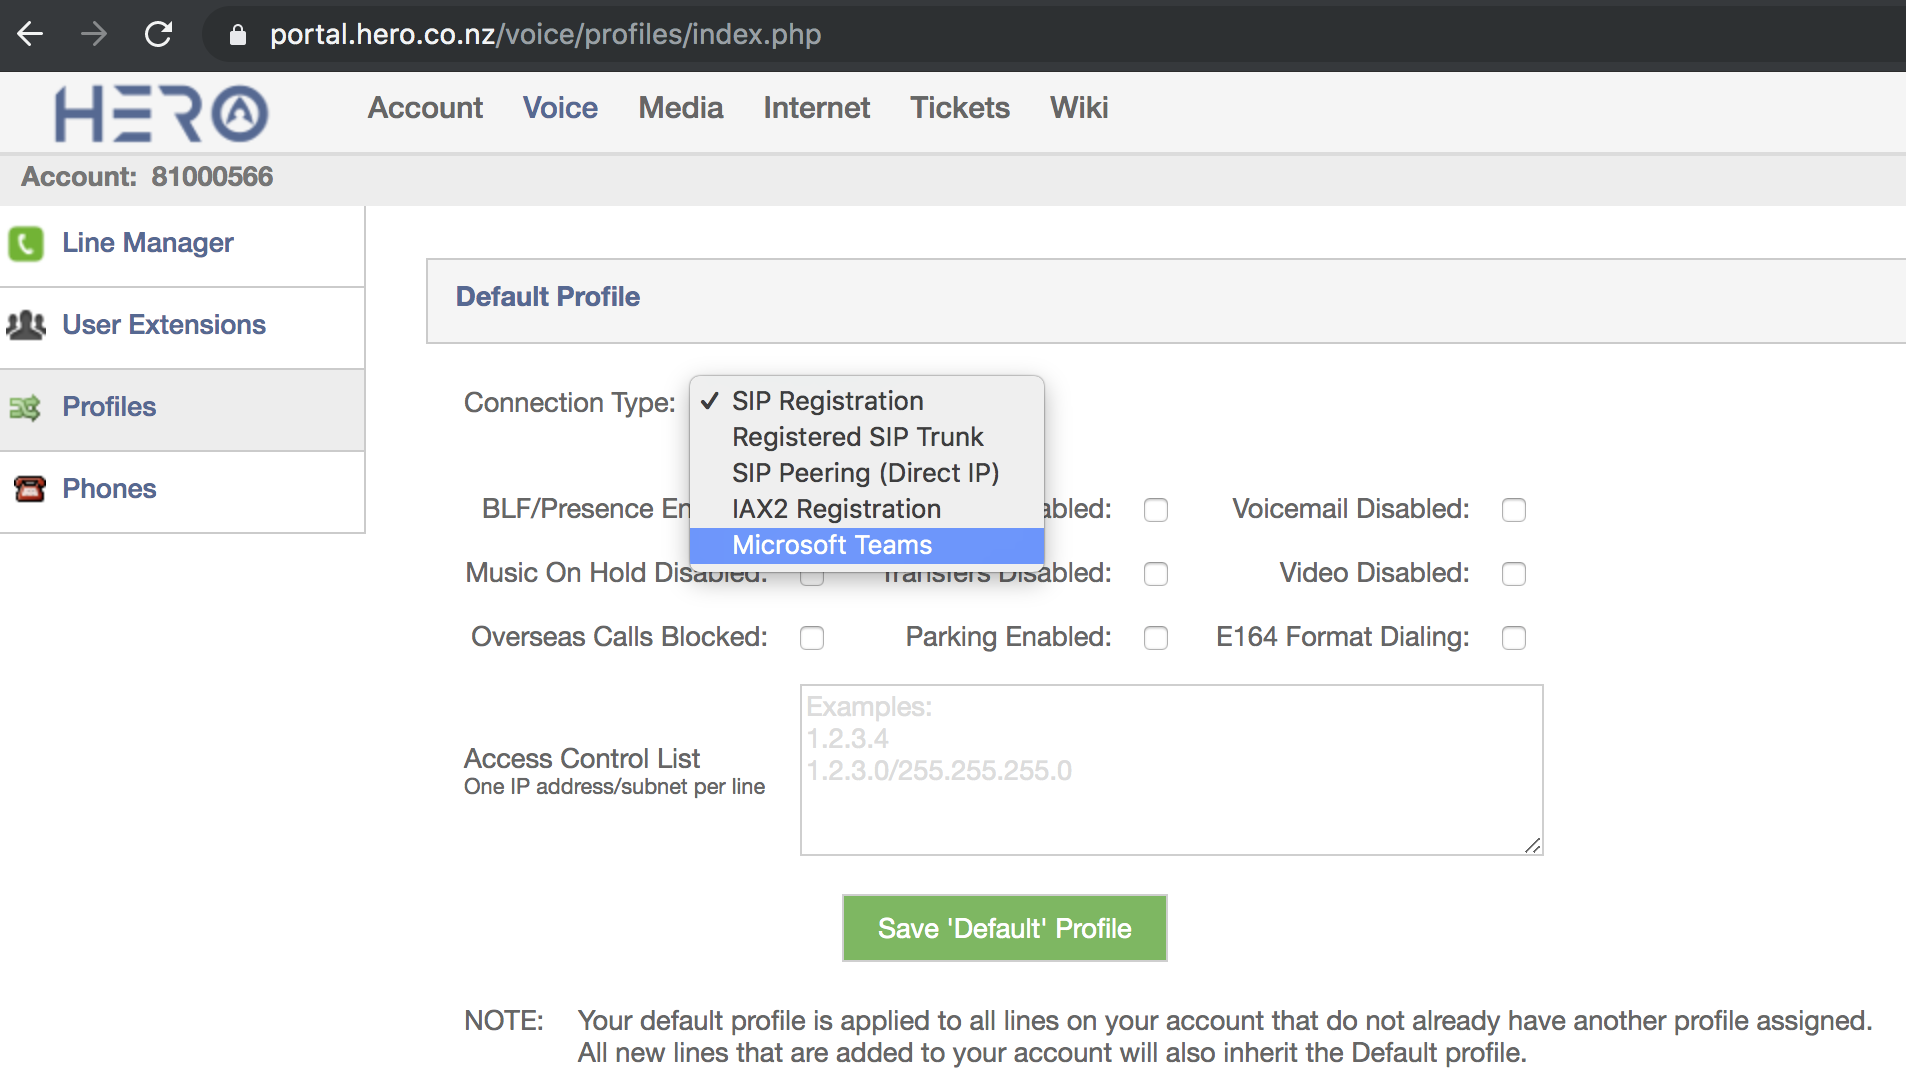
SIP Registration, Peering and IAX2 explained
SIP Registration, Peering and IAX2 explained
Tel2 supports SIP registration, SIP peering and IAX2 registration to connect your VoIP service.
SIP Registration
The simplest of the three connection types “Registration” is used to connect IP phones and some IP-PBX machines to our hosted cloud PBX. By configuring your IP-phone credentials (found in your CloudPBX portal – fig A) and the SIP Server / proxy host details (fig B) you’ll be ready to start making calls.
SIP Peering
Enables a direct trusted network-to-network connection between your IP-PBX and our voice public IP. The main advantage of Peering is greater flexibility of number routing within your onsite-PBX. To use Peering you will require a static WAN IP address.
IAX2 Registration
Tel2 also support the IAX2 Protocol aimed at customers with an Asterisk based IP-PBX system including Asterisk, Trixbox, FreePBX, Callweaver and others.
If your IP-PBX, gateway or phone supports the IAX2 protocol then it should be compatible with our IAX2 service. IAX2 has a number of advantages over the SIP protocol including:
IAX2 trunking is more efficient with your Internet bandwidth when making multiple calls - often using less than half the bandwidth of the equivalent SIP calls using the same voice codec. For example eight G.729 calls using SIP will use around 250kbps with SIP but less than 100kbps using IAX2 trunking.
With IAX2 it is easier to connect to us when behind a router or firewall as a single port number is used for both signalling (call setup information) and media (voice traffic). This removes the complexity of traversing some problematic firewalls etc. and removes problems with no audio or one way audio etc.
DTMF traffic is always out of band removing any confusion about which DTMF method to use
Firewalls and Interfering routers are the most common cause of SIP registration failure with your VoIP device where the firewall/router blocks incoming traffic required by our SIP registration process. Remember that the process of any SIP registration comprises a sequential number of requests and challenges between your PBX or handset and CloudPBX as the registration server.
The underlying logic is our CloudPBX authenticates your credentials, and secondly stores your IP address and port number at the moment of registration. When a call hits our CloudPBX we in turn redirect that call to the last successfully registered IP address and port on your router. If your router blocks our incoming traffic, the call will fail.
The easiest way to get around these SIP ALGs is to set your SIP Transport to 'TLS' (instead of UDP) - this encrypts the SIP so your routers/firewalls cannot interfere with the SIP traffic. Our own Tel2 Apps for Android etc. all use TLS to avoid these issues. This might be why your own SIP device is not working while our Tel2 Apps work just fine.
If TLS is not available, the next trick you can try is to set the 'Proxy' or Host settings to use a non-standard SIP port to connect to our service. We support port 50600 for this purpose so you can set your Proxy to phone.tel2.co.uk:50600 (instead of just phone.tel2.co.uk) - this should tell your device to use port 50600 instead of the usual 5060. Some devices have the port in a separate box but most you just put it after the host name with :50600 at the end.
Next, you can look at your router and/or firewall device and look to turn off the SIP ALG functionality. If you can't see this setting in your router then send us the make/model of your router and we will do some research for you to see how this functionality is turned off.
Lastly, the issue can sometimes be related to NAT (Network Address Translations) timeout being too low on your device. Sometimes this is configurable, sometimes it isn't. If you can configure the NAT timeout (for UDP traffic) then set this to 1 minute (60 seconds). One other trick to combat a low NAT timeout value is to register with our service more frequently. So you can set the Registration Timeout to 60 seconds for example. This means your device registers with us every minute but it also has the effect of keeping the NAT connections alive for your phone to avoid the NAT timing out and our service having issues connecting to your device which is on your LAN.
Registration – Inbound only
We don’t require you to register to make an outbound call as we check your credentials on each call. Registration is merely the mechanism we use to direct incoming calls through to your router /firewall and ultimately phone or PBX (if using registration).
SIP Keep Alive
For security routers are oblivious to the requirements of SIP and by design regularly close the ports preventing CloudPBX from redirecting to your PBX or handset. To avoid, set your phones “Keep Alive” values to 60 seconds an interval generally well inside the period most routers close their incoming ports. This means every minute your phone updates our CloudPBX registration server with its latest IP address and port setting. When an incoming call is received to our network, we can be confident of your IP and port numbers.
Recommendations
SIP ALG: We recommend disabling SIP ALG as most implementations incorrectly modify SIP and ultimately corrupt SIP packets rendering them unreadable causing unexpected behaviors such as registration and incoming calls failing.
TLS: Is a reliable work around which alleviates interference caused by SIP ALG as TLS packets are encrypted ultimately preventing corruption. To use TLS set your phones or endpoints to port 5061.
Port Forwards: For SIP peering installations we recommend port forwarding all traffic on UDP port 5060 to your device. Additionally we strongly recommend you set your firewall access control lists (ACL) to limit to traffic on 5060 to our trunking IP address (27.111.15.65) or our subnet 27.111.15.0/24. Note: we have also configured port 50600 on our end to receive SIP traffic.
Author: Support Last update: 2016-05-29 05:18
Bogus or Spam incoming calls
Bogus or Spam incoming calls
If you’re experiencing spam or phantom incoming calls that appear as “blocked” or CLIs such as 100 you are probably the victim of a form of malicious attack. In summary they come in two forms:
An overseas call centre has your number and while unwanted is making genuine calls which often display the CLI as ‘blocked’. As your carrier, we will quickly block these calls once advised by you after we confirm the originating source.
A port scan into port 5060 is actually a form of attack to your router for those customers connecting over the public internet using ‘Peering’ or alternately ‘Registration’ with port forwarding to port 5060 but importantly missing the appropriate firewall rules. As attacks like this do not come via our network they don’t show in your CDR record. These calls can be dangerous, as they are attempts to enter your PBX, then route calls back out through your CloudPBX account to selected and expensive destinations across Asia, Africa and parts of eastern Europe. Our strong advise is to quickly “lock down” your device with the appropriate firewall rule on SIP port 5060.
Author: Support Last update: 2016-05-29 05:27
Auto Attendant to a Call Queue
Auto Attendant to a Call Queue
Solution Summary
The solution links the main office number to an Auto Attendant which links to a Call Queue following completion of the Auto Attendant greeting.
Auto Attendant: In this solution example the Auto Attendant has no other forwarding numbers (eg dial 1 for sales, 2. for support etc)
Forward: In this example once the Auto Attendant message completes we have set it to a Call Forward always which in turn directs it our Call Queue.
Call Queue: Call Queue’s require another system on-net number to operate.
Things to consider when setting up Call Flow
Call Flow Priority: All calls into our platform flow logically through a Call Flow priority. For example implementing Call Rejection as the highest priority will prevent any other feature from initiating such as Auto Attendant.
Internal Call transfers: Calling between numbers held on the account are classified as ‘on-net’ calls and are £0.00 rated (free). Any calls to off-net numbers such as mobile, premium or numbers held by other telcos are charged per your standard calling terms.
Internal Extn: Both the Auto Attendant and Call Queue require additional DID.
Testing: Spend a few minutes to incrementally building your Call Flow taking time to test each stage as you go. Using the sample Call Flow above first create your Auto Attendant linking simply linking to each number. Once you’ve got that going test each call flow as you build up your rules.
Author: Support Last update: 2016-05-29 05:31
How do access Tel2 features directly from my phone/handset without using the web portal?
Tel2 SIP Trunking is available on all of our plans - or you can choose our 'SIP Trunking Plan' where you can receive 1 free DDI and channel and can then purchase additional DDIs at a low £1.50 each and additional channels at £1 each (sold in blocks of 5 channels). We also allow you to add our mobile bundles to reduce your calling costs
Here are some great reasons why Tel2 SIP Trunking is the best option for your IP PBX PSTN connectivity. Customers have two options when connecting their IP capable PBX to Tel2 - SIP Peering and Registered Trunks. Both services are available on ALL Tel2 accounts and can be configured in Tel2 Now. Simply make the choice that best suits your business requirements.
What are the generic SIP settings for connecting a SIP compliant device to your service?
Customers with their own SIP enabled phone, gateway or PBX are free to use this to connect to Tel2's service. The device must be SIP v2 compatible. Refer to the settings below for a guide to how you should configure your device to connect to the Tel2 service.
Username/Login/User ID:
Your Tel2 Phone Number inc. country code (e.g. 442034567890)
Authorisation Name/Display Name:
Your Tel2 Phone Number inc. country code (e.g. 442034567890)
Password:
Your Tel2 Password (assigned at signup)
Host/Proxy/Domain:
phone.tel2.co.uk (or phone.tel2.co.uk:50600)
Outbound Proxy:
phone.tel2.co.uk (or phone.tel2.co.uk:50600)
DTMF Mode:
rfc2833 (or AVT/out of band)
Default voice codecs:
G.711 alaw, G.711 ulaw, G.722, G.729a
Default video codecs:
H.264, H.263
SIP Transport:
UDP, TCP or TLS (TLS preferred)
SIP port:
5060 or 50600 (udp, tcp) or 5061 (tls)
STUN Server:
stun.tel2.co.uk (port 3478)
Firewall Rules:
Allow all traffic from 27.111.15.65 (UDP portrange 1024-50000, TCP port 5060 and 5061)
Troubleshooting
If you are having problems registering your phone or PBX with our service then this may be due to a SIP ALG (Application Layer Gateway) on your router or firewall interfering with the SIP traffic or blocking it in some way. It may also be a firewall issue. We recommend in this case to try and use 'TLS' as your SIP transport (rather than the usual default of UDP). This will switch the traffic to an encrypted port which will effectively hide the SIP traffic from your network equipment.
If you do not have TLS transport as an option on your device then another work around is to switch the port number you use to register to us to be 50600 (instead of 5060) - this again can avoid ALG related problems since the port is unknown to the router as a SIP port. Usually the port is set on the end of the Outbound Proxy/Proxy address (e.g. phone.tel2.co.uk:50600) but can sometimes be in a separate 'port' field. Do not confuse your own SIP port with the one you are connecting to on our side. If in doubt contact support@tel2.co.uk for assistance.
If you are experiencing one way voice particularly on incoming calls the most probable cause is SIP ALG. While originally designed to resolve a NAT related problems, with no standard implementation many routers and software based firewalls corrupt the SIP message by attempting to rewrite part of the SIP message. Frustratingly the one-way voice issues will often only occur on a single number and will clear once the router has been reset.
As a general rule all VoIP service providers recommend disabling SIP ALG (see VoIP Org).
If you are unable to access the router consider switching your phone or PBX to use TLS which to encrypt the SIP packet ultimately preventing SIP ALG corruption.
1. Disabling SIP ALG – Cisco IOS Router
From the CLI: Enable configure terminal, No IP nat service SIP UDP port 5060
For TCP run: No ip nat service sip tcp port 5060
2. Disabling ALG – DrayTek Routers
This guide specifically applies to the Vigor 2760 but is also applicable to most other DrayTeks in the series.
2800, 2820, 2830, 2860, 2920, 2925, 2960
Windows
Start | Cmd
Type: telnet 192.168.1.1 (Enter) NB – Ensure Telnet is enabled ( Start | Control Panel | Programs | Programs and Features | Turn Windows Features on or off | TELNET CLIENT >> OK)
Default user name: admin | admin
Type: sys sip_alg 0 (Enter) Enter
3. Disabling ALG – Juniper JunOS Router
From the CLI: To verify if SIP ALG is enabled or disabled run show security ALG status | match sip
To disable run:
Configure
Set security alg sip disable
Commit
4. Disabling ALG – Netgear Modem Router
This guide applies to most Netgear routers
In browser browse to 192.168.0.1 (this is the default IP address)The default username is admin and the default password is password
Under Advanced select WAN Setup
Check Disable SIP ALG option
Select Apply
5. Disabling ALG – SonicWALL
This KB applies to all SonicWALL SonicOS firewalls.
SonicWall has a feature called SIP Transformations that consistently cause total or partial loss of voice.
Log into the web interface on the SonicWall.
On the left, find the VOIP tab. Depending on the version of SonicOS your screen may appear slightly different.
Disable SIP Transformations: Browse to the SIP Settings page and ensure Enable SIP Transformations is NOT enabled.
Enable Consistent NAT: The Consistent NAT setting will ensure the same NAT port is used. If this is disabled, you may experience undesired call behaviour.
Ensure Consistent NAT is Enabled
6. Disabling ALG – TP-LINK Modem Router
This KB applies to most TP-LINK routers.
On Windows 7/8
Start | cmd >>Enter
Type:telnet 192.168.1.1EnterNB – Ensure Telnet is enabled ( Start | Control Panel | Programs | Programs and Features | Turn Windows Features on or off | TELNET CLIENT >> OK)
Default user name: admin | adminNote that no symbols may appear when typing in the password, but continue anyway.
Type inip nat service sip sw offEnterIf successful, it should say Nat SIP v2 switch off!
7. Disabling ALG – Billion 7300GRA, 7800
8. Disabling ALG – Zyxel Equipment
Web UI: Using the Web Interface Navigate to the NAT tab and uncheck the box for SIP ALG.
Using Telnet
Telnet into the router Select menu items 24 then 8
To display current SIP ALG status run the following command:
9. Disabling ALG – Netcomm
While the following KB guide specifies the NB604N all Netcomm routers are similarly configured. Netcomm also provide a useful router emulator for all their routers.
Adding credit to your account is easy. As well as using a credit card you can also use Paypal to add credit to your account. However note that you cannot setup automatic payments using Paypal - but only topup manually using this method.
Select 'Use Paypal' as your payment method. You will be diverted to Paypal to complete the payment process.
Click Accept to make payment.
Author: Support Last update: 2016-05-28 00:28
Cloud PBX Features
Media – Audio and Greetings
Media – Audio and Greetings
We allow you to upload your own customised media for Voicemail, Auto Attendant, Music on hold, Ring back tone and Caller Tunes using the Media upload feature.
Line Number Select | select hyperlink under required line
Select Media tool
Media formats
MP3 Only: We only support MP3 media so if your media is in a WAV format you will need to convert into an MP3.
File size: If you find your Voicemail message is immediately hanging you may need to check the file size of the media. If your MP3 file is larger than 750k try reducing the file size by converting the media to 41,000 Hz 96k.
Author: Support Last update: 2016-05-28 08:28
Reception Console
Reception Console
The reception console shows all the lines on your account and whether or not they are logged in and active on your account.
Select CloudPBX > select the number you want to make the call from .
Select Call.
Add the number you wish to make the call from (must be in your account).
Add the number you wish to call.
Click Connect to make the call.
Author: Support Last update: 2016-05-28 08:30
Feature Short Codes
Feature Short Codes
Use the following short codes on your CloudPBX phone to setup various features from your handset instead of logging into the CloudPBX.
NOTE: Wherever you see ‘xxx’ below, this refers to a number you enter:
Popular codes
*55
Access Voicemail Portal
*88
Group Pickup
##
Perform a ‘blind’ transfer to another number (if not disabled)
#0
Perform an ‘attended’ transfer to another number (if not disabled)
Mail
*55
Access Voicemail Portal
*99
Voice Portal Menus
Forwarding and Locate me
*72xxx
Call Forward Always Activation
*73
Call Forward Always Deactivation
*92xxx
Call Forward No Answer Activation
*93
all Forward No Answer Deactivation
*90xxx
Call Forward on Busy Activation
*91
Call Forward on Busy Deactivation
*561xxx
Enable and Set ‘Locate Me’ Number 1
*571
Deactivate ‘Locate Me’ Number 1
*562xxx
Enable and Set ‘Locate Me’ Number 2
*572
Deactivate ‘Locate Me’ Number 2
*563xxx
Enable and Set ‘Locate Me’ Number 3
*573
Deactivate ‘Locate Me’ Number 3
Do not disturb and Privacy options
*78
Do Not Disturb Activation
*79
Do Not Disturb Deactivation
*30
Caller ID Blocking Activation
*31
Caller ID Blocking Deactivation
*77
Anonymous Call Rejection Activation
*87
Anonymous Call Rejection Deactivation
*60xxx
Selective Call Rejection (Blacklist) Addition
*80xxx
Selective Call Rejection (Blacklist) Removal
*65xxx
Make a call with Caller ID visible
*67xxx
Make a call with Caller ID blocked
*32
Anonymous caller screening Activation
*33
All callers screening Activation
*34
Call screening Deactivation
Remote callback/dial-tone options
*94xxx
Remote Dialtone Service Number Addition
*95xxx
Remote Dialtone Service Number Removal
*96xxx
Remote Call-back Service Number Addition
*97xxx
Remote Call-back Service Number Removal
*98xxx
Remote Access Authorisation Pin Setup
*98
Removal of Remote Access Authorisation Pin (Trusted ANI only)
Auto Attendant options
*22
Record your auto attendant message/menu for callers
*23
Playback your auto attendant message/menu
*24
Activate the auto attendant service on your line
*25
Deactivate the auto attendant service on your line
Conferencing options
*40
Activate conferencing for my number (turn into conference room)
*41
Deactivate conferencing for my number
*42
Access your own conference room
Group Pickup options
*88
Group Pickup
*89
Directed Group Pickup
*89x
Directed Group Pickup (with specified pickup number)
Other options
*61
Call Waiting Activation
*81
Call Waiting Deactivation
*69
Call Return (Call back your last caller)
*66
Last Number Redial
*51
Who last called me?
*37xxx
SetAuthorisation Pin Code
*37
Remove Authorisation Pin Code (no digits after *37)
*74x
Program Speed Dial 8 (x can be 2-9)
*52
Toggle to activate/deactivate CloudPBX voicemail system
*54n
Set Call Diversion Timer where ‘n’ is number of seconds
Feature codes during a call
##
Perform a ‘blind’ transfer to another number (if not disabled)
#0
Perform an ‘attended’ transfer to another number (if not disabled)
*1
Start/Stop a manual recording of a call (if not disabled)
*0
Disconnect from a call
Author: Support Last update: 2016-05-28 08:31
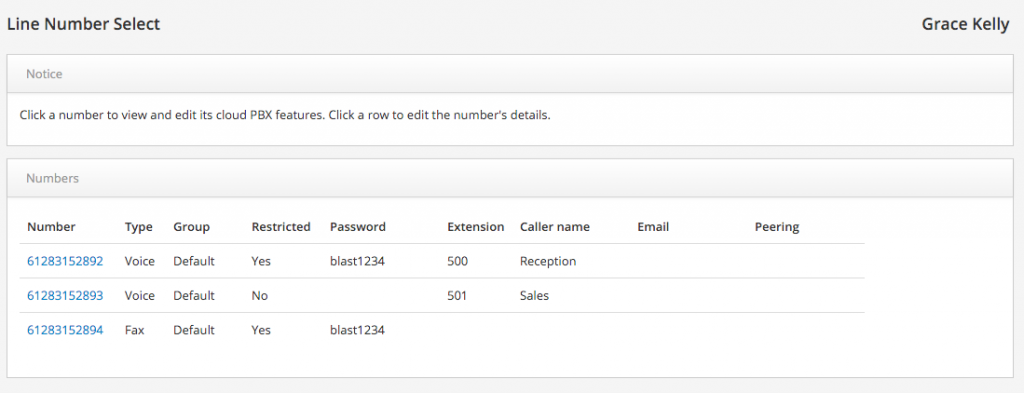
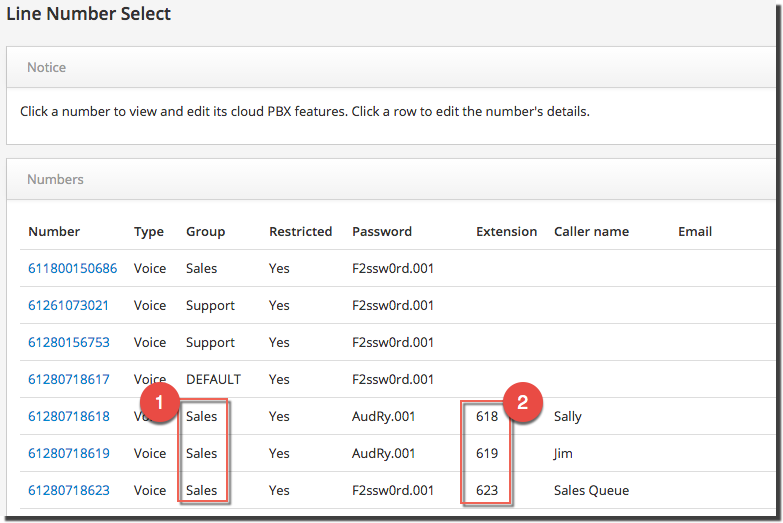
Cloud PBX Numbers Settings
Cloud PBX numbers settings
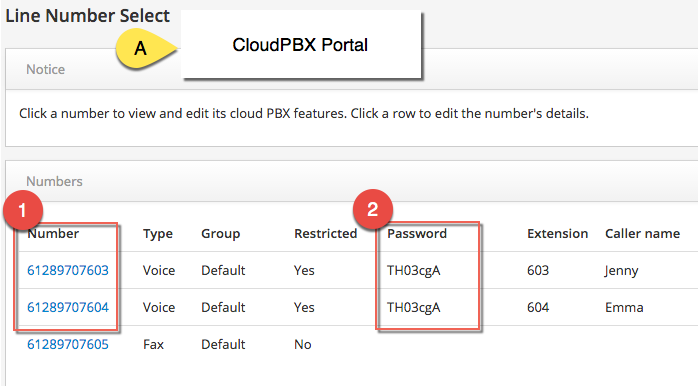
As the name suggest Line Number Select is the key admin tool for accessing individual numbers on your account. Additionally you can use Line Number Select to enable/disable all account numbers, restrict lines and set passwords and Caller IDs, create extension numbers and finally control a number of additional security features and settings.
Use Line Number Select to first enable phones, set passwords and control access to the following:
Click on the line you want to adjust, and make changes
Click Save Changes
Call logs, or call data records (CDR), are free with all accounts.
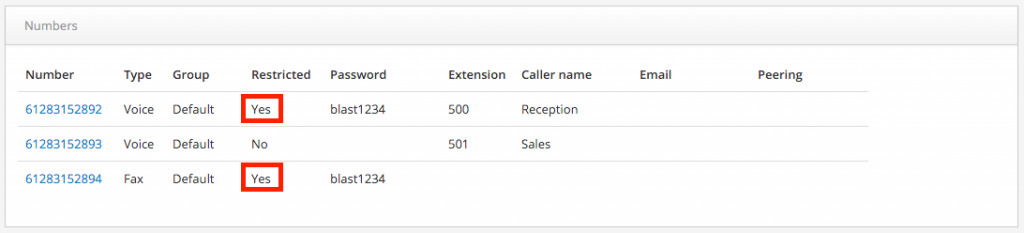
Restricting a Line
Restricting a line enables an individual user to login and manage their own line without having to grant that user access to the entire account. Once a line is restricted the user cannot access billing information or the admin panel.
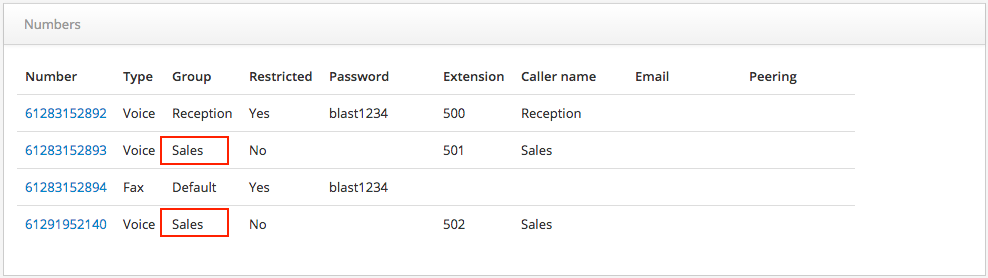
Line Groups
If you are in a larger organisation, or a company split across multiple offices use the Line Group ID feature to create individual offices or departments. In the example below we have created three separate departments for Sales, IT and Accounts. Now anyone within these groups can create their own extension numbers unique to that department. Another example is where you can hear one of your colleagues phone ringing with the ability to hit the *.88 pickup key and not risk picking up a call from team member outside of this office or group.
Author: Support Last update: 2016-05-28 08:34
Call Flow Priority
Call Flow Priority
Occasionally you’ll configure a feature only to discover that another feature on the account has over-ridden your preferred feature. For example you can’t set Call Rejection and Call Forward on the same line, as the Call Rejection has a higher priority than the lower call forwarding.
Here is a complete list of call flow priorities from the dial plan:
Call Rejection (block anonymous callers and blacklisting)
Remote Dialtone
Remote Call back
Conference Room
Auto-Attendant
Agent Queuing
Do Not Disturb
Call Screening
Call forward Always
Simultaneous Ring
Hunt Groups
Author: Support Last update: 2016-05-29 01:00
List of Cloud PBX Features
List of Cloud PBX Features
All Cloud PBX customers are licensed to use ALL these features (and more) regardless of which plan or bundle you select. This is what makes Tel2 different to our competitors. We don't charge extra fees for extra functionality!
Inbound Calls
Simultaneous Ring / One number: Receive call to up to five phones all ring simultaneously, or by a variety of business rules.
Call Forwarding or trunking: Setup calls to forward when you are on the phone or if you do not answer.
Do Not Disturb: Automatically forward calls to voicemail or play busy tone if you do not wish to be disturbed
Call Queuing: Choose whether to answer another call if you are already on the phone.
Call Rejection Options: Choose whether to accept calls from Anonymous callers and specify your own list of blacklisted numbers.
Call Screening Options: Choose whether to screen all or just anonymous incoming calls.
Voicemail Service: Set your Voicemail PIN number and select whether to disable the service.
Auto Attendant: Create your own auto attendant prompts for callers.
Directed or Group Call Pickup: Pickup an incoming call to another phone on your account.
Agent and Queuing: Up to 10 agents or front office personnel with the ability to queue calls applying a variety of common Call Center rules
Hunt Groups: Select up to 10 numbers to hunt through for incoming calls and specify different timeouts for each hunt attempt.
Call Forward Unreachable or Network Call Forward: Allows users to set a call forward number for when their device is unreachable or unregistered – for example in the event of a power or DSL outage. This is in addition to our Call forward always, busy and no answer services.
Outbound VoIP Calls
Authorisation PIN Code: Setup an authorisation Pin Code to protect any calls made on your account.
Speed Dial: Program 8 speed dial numbers so you can quickly make calls by entering a single digit.
Call Privacy and Caller ID: Choose whether to make anonymous calls by blocking or replacing your own Caller ID.
Last Number Redial: Dial *66 to redial the last number you called. Select your confirmation options here.
Call Return: Dial *69 to dial the last number that called you. Select your confirmation options here.
Advanced Features
Call Recording: Setup your call recording options for all your inbound and outbound calls are automatically recorded or not
Call Parking: Park incoming calls to a 'parking lot' number and then retrieve those calls from another extension without the same account and group
Conferencing: Use your Cloud PBX number and create a room to talk with others at the same time
Remote Call Back: Call your Cloud PBX number from any phone. When you hear ringing, hang up and you will be called back – so you can make a call from Cloud PBX!
Remote Dial Tone: Make calls from your Cloud PBX account from another phone by remotely dialling in to initiate the call
Call Transfers: During a call you can transfer the other person to a new number by dialing #0 for an attended transfer or ## for a blind transfer
Caller Tunes & Hold Music: Upload your own MP3’s to replace ringing when people call you and setup your own music on hold
Preferences
Auto Top up & Notifications: Automatically top up your account and change account balance and call duration notification thresholds when making calls
Personal Information: Change your personal details including the name and caller ID displayed when making calls.
Extension Dialing: Setup a short extension number for each line on your account to dial your numbers more quickly
Time and Login Options: Set your preferred language, timezone and date options.
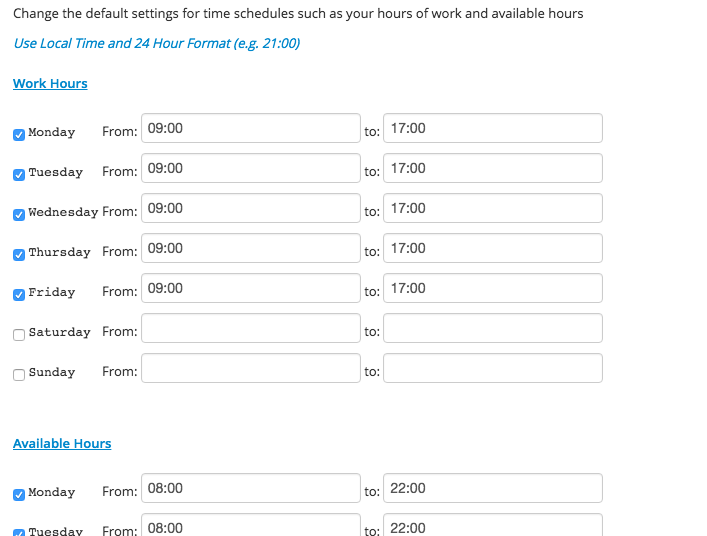
Time Schedules: Change the default settings for time schedules such as your hours of work and available hours
Voice Quality & Networking: Choose your voice and video call quality preferences and network preferences
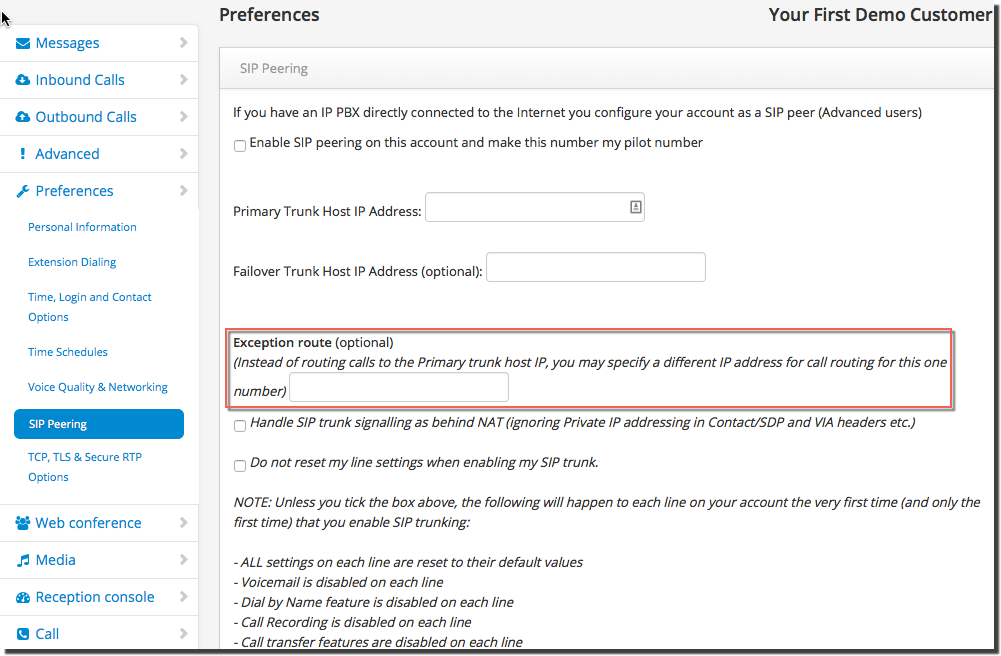
SIP Peering: If you have an IP PBX directly connected to the Internet you configure your account as a SIP peer (Advanced users)
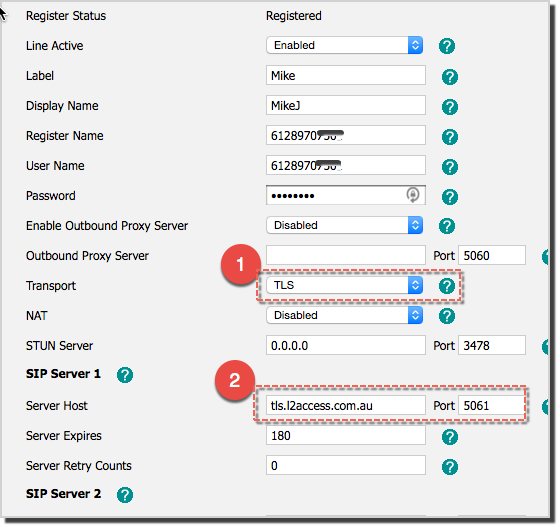
TCP SIP: Users can now choose between UDP or TCP SIP. TCP SIP offers reliable communication of SIP traffic and support for longer NAT (Network Address Translation) timeouts and will also enable support of ‘TCP only’ platforms such as Microsoft Lync/OCS to connect to Cloud PBX and take advantage of our great VoIP packages.
TLS Support: provides a secure encrypted transmission of SIP for deployments that require increased security. You should connect to au.tlssip.com as your proxy/host using TCP port 5061.
Secure RTP/SRTP: Our Cloud PBX supports Secure RTP connections from devices that support the protocol. SRTP allows for secure transmission of the media/audio stream for deployments that require increased security.
G.722 Wideband 16KHZ: which provides high quality superior audio on calls. G.722 is supported by a number of devices including Polycom.
Network Redundancy: Using our own Internet address space enables us to multi-home all services allowing automatic failover from one hosting provider to another in the event of an upstream outage or network issue. We’ve also increased automation for failover in the unlikely event of system issues or hardware failures, allowing us to switch to backup/standby systems in seconds.
Author: Support Last update: 2016-05-30 09:57
Cloud PBX Features » Inbound Calls
Voicemail Service
Voicemail Service
Tel2 Voicemail puts you in control of setting up and accessing your messages from anywhere. Our standard voicemail features include personal recordings for BUSY and UNAVAILABLE, save, delete, forward and the ability to deliver via email and use SMS for notifications (charges apply).
You can check your voicemail from any Tel2 phone line by simply dialing *55 on your handset. If you wish to check your voicemail externally from a non-Tel2 phone then you can dial:
+44-203-670-9996 (or 0203-670-9996 inside the UK)
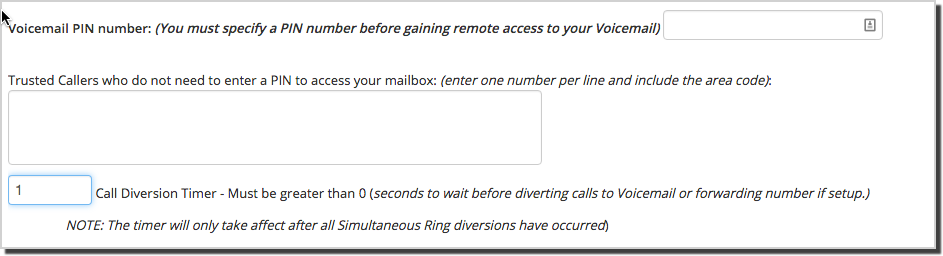
You will be prompted for your phone number (which should be in 44xxx format) and then your PIN code. Before you can do this however you will need to assign yourself a PIN number in our customer portal at:
Simply login with your Tel2 phone line and then assign a PIN code in the 'Voicemail PIN number:' field. You can also forward voicemails to an email address and setup other options in this page.
NB – We recommend writing a script and rehearsing before recording any CloudPBX messenging.
Step 2: Recording your VM
Click to Record: Click either the UNAVAILABLE or BUSY functions and enter your phone number. Tel2 will phone you back and prompt you to record your message. Once you have recorded your voicemail, follow the prompts to confirm the message or start afresh.
Media Upload: For higher quality recordings for Voicemail UNAVAILABLE or BUSY (as well as Auto Attendant, Music on Hold, and Caller Tunes) you can upload your MP3 recordings using the Cloud PBX Media Section.
We have a maximum file size of 500kb per VoiceMail. For larger voicemails we recommend dropping the the recording rate to 256kb (any reduction in quality will be indecipherable to the incoming callers).
Step 3: VM Access and Delivery
Accessing your Voicemail box: You can access your own inbox by dialling *55.
Voicemail PIN number: To access to your voicemail from phone not directly linked to your message box requires a PIN code (see Voicemail PIN number). To access that box enter *55 at anytime during the message. You will be greeted by the message……”please enter your password followed by the # key”
Trusted Callers: Create a trusted caller number list to avoid the extra step of entering a Voicemail PIN code. To access that box enter *55 at anytime during the message. Because your number is on the Trusted callers list you will not be challenged for a PIN code.
Call Diversion Timer: Sets the seconds to wait before diverting to voicemail or forwarding.
Email: Enter the email address where you want your voicemail messages delivered.
SMS: Send and SMS alerts to let you know you have a new voicemail. Note each SMS will cost 20 cents.
From a Tel2 Phone: Dial *55 from your Tel2 phone to access your personal mailbox.
Feature Keys
4 – previous message
5 – Repeat
6 – Play next message
7 – Delete
8 – Forward
9 – SAVE
Voicemail Star Access: Dial your own Tel2 number from any phone and wait for it to go to voicemail then press *55 and you will be prompted for your PIN code (this must already be setup) followed by # to access your mailbox messages as normal. You can also setup calling numbers as trusted callers to avoid having to enter a PIN number.
From Tel2: You can check your new voicemails by simply logging into Tel2 and clicking on the messages tab. (You cannot setup prompts etc. using the web interface however).
From email: You can login to Tel2 and under voicemail settings setup an email address to forward all voicemail messages onto. For the technically minded Subscribers you can also connect to our IMAP server (mail.cloud2tel.co.uk) and check your voicemail directly from your email client such as Outlook.
Select CloudPBX > Inbound Calls > Voicemail Service
Click the checkbox Turn off your Voice-mail call diversions
5. YouTube – Managing Voicemail
6. Managing After hours Voicemail
To setup an after hours Voicemail you will need to configure a Call Forward and secondly your Time Schedules (under Cloud PBX, Preferences) to define your office work hours.
Author: Support Last update: 2016-05-29 09:45
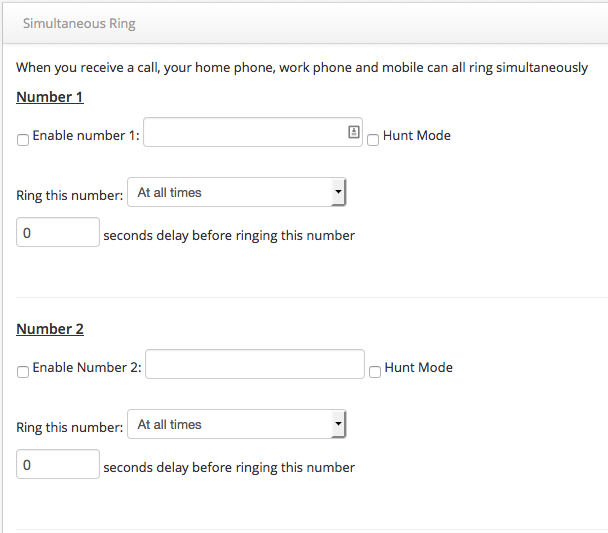
Simultaneous Ring
Simultaneous Ring
Use Simultaneous Ring to call up to five other phones simultaneously (SimRing) or specify a delay and stagger using Hunt mode.
Select CloudPBX > Phone number you require SimRing on
Select Inbound Calls > Simultaneous Ring
Set your target numbers
Specify your time schedule
Set delay before ringing (0=immediately)
Click Save settings to update.
Note: If you need to configure forwarding rules on the individual DID, use the Forwarding or trunking feature to access that individual DID.
Author: Support Last update: 2016-05-28 03:21
Shared Line Call Appearance
SHARED LINE FEATURE
The Tel2 Shared Line service enables you to have up to 6 devices or phones registered against a single Tel2 number at the same time. When someone rings the Tel2 number all phones/devices will ring at the same time. A great example of this is if you have Tel2 App (Softphone) and a VoIP handset or dual mode cellphone.
Instead of having a Tel2 number for your handset/cellphone and another Tel2 number for your softphone - simply use the same number on both and no matter where you are people will be able to reach you. Tel2 Shared Line is also useful in a small office situation where you have Shared Line and want it to ring all the office phones at once. Of course if you're away from an area with internet access you can still use the Simultaneous Ring service to have your cellphone or landline ring as well.
You should choose one device as your primary device. In the SIP settings for your primary device enter your Tel2 number and password as usual. For each additional device you will need to add a suffix to your Tel2 number/login. The suffix will need to take the format of a dash followed by the number 1-5. Each device will need a different number/suffix or else the service won't work. The password is the same for each device.
The maximum number of devices you can register against one Tel2 number is 6 including your primary device
Here's a sample/example configuration:
Primary Device - Cisco VoIP handset - Login as '442037654321'
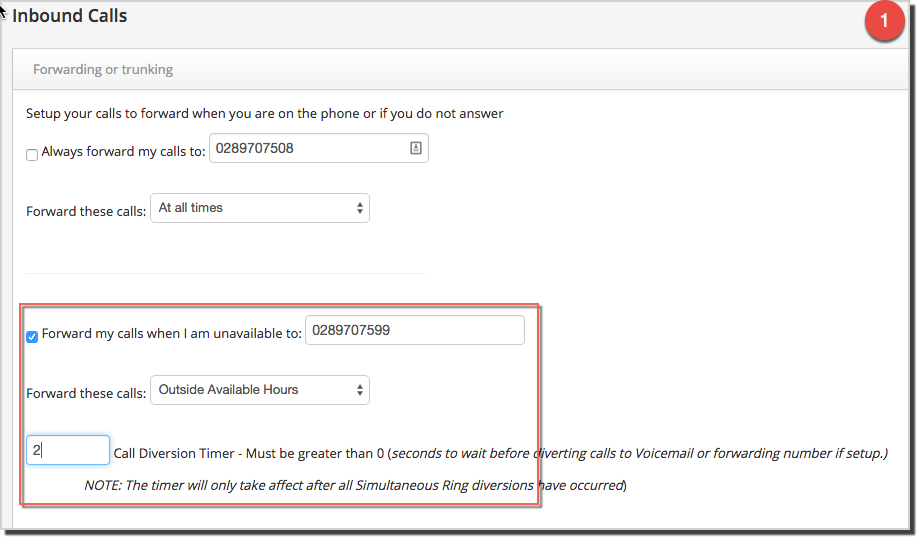
Control your incoming call flow when you’re away or busy with a permanent call forward. Use time schedules to give you more flexibility, for example, have your calls forwarded straight to your mobile during the day with an after hours forward to your after hours voicemail box.
Terms:
Call Forward Busy: Enables Subscribers to redirect calls to another number when an incoming call receives a busy response.
Call Forward No Answer: Enables Subscribers to redirect calls to another number when an incoming call is not answered within a specified time frame. Configurable via feature code, voice IVR and within the CloudPBX.
Call Forward Always: Enables a user to redirect all incoming calls to another phone number. Configurable via feature code, voice IVR and within the CloudPBX.
Auto scheduling: Automatic such as recurring meeting or for after hours support.
Emergency Diverts: If for what ever reason your VoIP data link is taken offline, use Call Forwardingto quickly divert all incoming phone calls to alternate land-line or mobile contacts.
Set Forward my calls when I am unavailable to: (set number)
Set Forward these calls: Outside Available hours
Call Diversion time: set to 2
Setting up an after hours voicemail will require the purchase of an additional number, which you will set your call forward to.
Inbound Calls | Voicemail
Goto nominated After Hours VoiceMail number (Inbound calls | Voicemail Service)
Record Voicemail UNAVAILABLE message
Call Diversion Timer: Set to 2
Inbound Trunking Options
NB – see also Outbound Trunking
By default inbound calls are delivered to a phone which has logged in against that same number. However, some customers prefer to have multiple inbound numbers terminate on a single logged-in device. This setting allows you to send inbound calls for this phone number to the registration or login of a different number on your account. By using this option you can create one or more inbound trunks for your incoming calls. If you enter a number here which is not on your account – then this setting will simply be ignored and removed. The number format should be the same as the registration ID. e.g. 442034567890
CloudPBX | Inbound Calls > Call forwarding or trunking
Select Inbound trunk number
Log into each restricted line and use Inbound trunking to pointing each required line to your terminated trunk DID.
Author: Support Last update: 2016-05-30 07:50
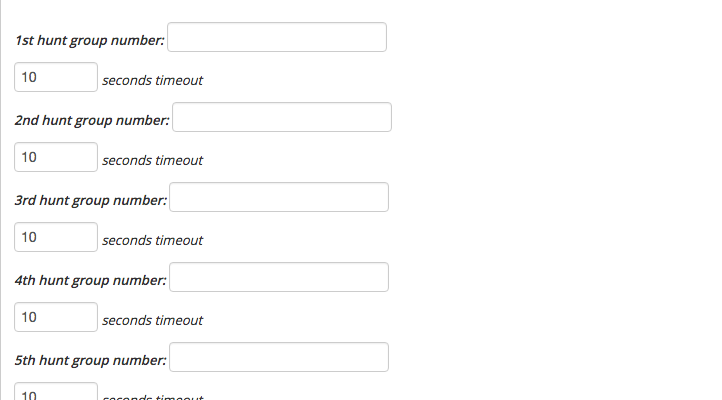
Hunt Groups
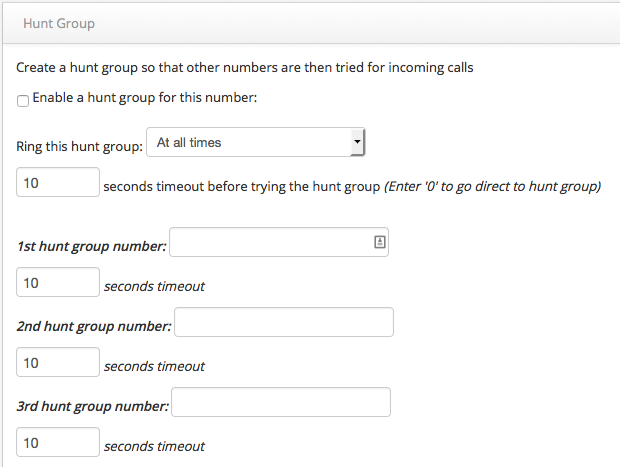
Use Hunt Groups for Managing Inbound Calls
Our Cloud PBX provides all users with a free and simple linear hunt group service. The service allows you to distribute phone calls from a single telephone number to a group of up to 10 phone lines. You can decide if you want the hunt group to be enabled at all times or on specific days and times (such as outside of work hours). The service also allows you to set how long to wait before moving to the next number in the hunt group and whether to follow normal call logic or send calls to voicemail on no answer from the Hunt Group lines.
Use the check box to enable a hunt group for this number.
Select an option and time (seconds) for when hunt group calls will trigger.
Set up your Hunt Group. You can have up to 10 numbers (1st to 10th) in a Hunt Group. Use the drop down box to select your time of day rules so the hunt group is only enabled during work hours etc.
Click Save settings to update.
Note: These will always be tried in order 1-10 so ensure you enter your Hunt Group numbers in the order of priority for answering calls. Each number can have its own timeout before moving on to the next number. The default is 10 seconds timeout for each number. Hunt Group numbers can either be CloudPBX or PSTN numbers are also allowed. If it is a CloudPBX number then the number is dialed directly without following any ‘features’ on that line.
Author: Support Last update: 2016-05-28 03:30
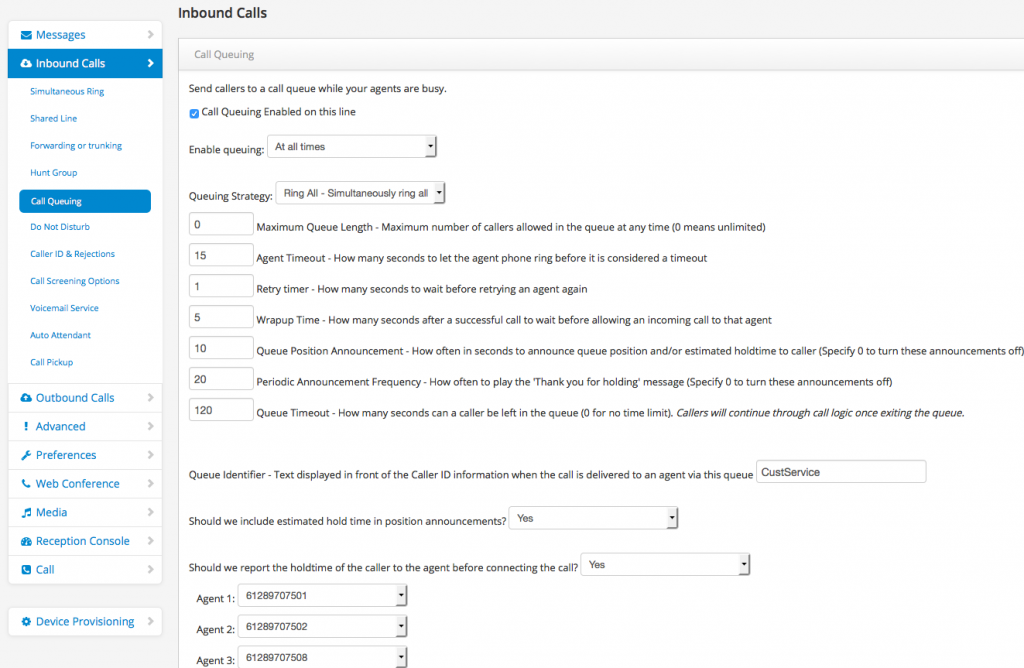
Call Queuing
Call Queuing
Long wait times means abandoned calls, lowered customer satisfaction and ultimately lost business. Call Queuing is perfect for busy front office or receptionist functions where incoming calls are directed to a pilot number. Using the CloudPBX you can set the position in the queue announcement frequencies, maximum number of callers in queue and a variety of time out values.
Go one step further and link CloudPBX Auto Attendant to the your advertised number to easily direct calls to sales, support or the finance group for example; providing a feature to your callers normally only available to large call centers.
If for what ever reason your agents are unable to answer the calls, you can redirect to a call forwarding, simultaneous ring or even just prompt to leave a voicemail message.
NOTE: Call Queues can only ring the main registered number as an agent and you cannot have shared line appearance lines (i.e.. 442034567890-1, -2, -3, -4 or -5) attached to queues. These shared lines will simply not ring on a queue - only the main number.
Maximum Queue Length: Maximum number of callers allowed in the queue at any time (0 means unlimited).
Agent Timeout: How many seconds to let the agent phone ring before it is considered a timeout.
Retry timer: How many seconds to wait before retrying an agent again.
Wrap-up Time: How many seconds after a successful call to wait before allowing an incoming call to that agent.
Queue Position Announcement: How often in seconds to announce queue position and/or estimated hold-time to caller (Specify 0 to turn these announcements off).
Periodic Announcement Frequency: How often to play the ‘Thank you for holding’ message (Specify 0 to turn these announcements off).
Queue Timeout: How many seconds can a caller be left in the queue (0 for no time limit). After the queue times out the call will fail over in the following order – Call Forward, Simultaneous Ring and finally VoiceMail ensuring the Queue is always responded to if not by an Agent directly.
Queue Identifier: Text displayed in front of the Caller ID information when the call is delivered to an agent via this queue.
Estimated hold time: YES/NO advise caller the estimated hold time in queue.
Hold-time agent advice: YES/NO advise agent the hold-time of the caller to the agent before connecting the call.
Author: Support Last update: 2017-03-23 10:17
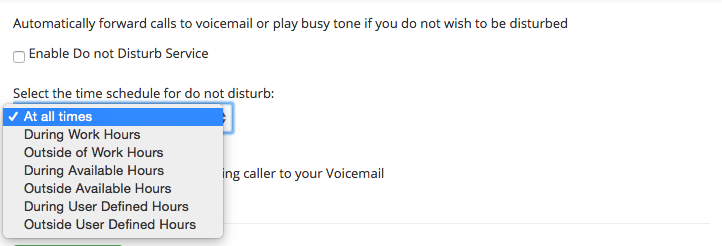
Do Not Disturb
Setting Your Phone To Do Not Disturb
You can easily avoid interruption by setting your phone to do not disturb. This will send your calls directly to your voice-mail or play a busy tone without your phone ringing.
Quick Guide
Log into https://now.tel2.co.uk > select the number you want to use Do Not Disturb with.
Select CloudPBX > Inbound Call > Do Not Disturb.
Click bos to Enable Do Not Disturb Service.
Click box to Play Busy Tone, if not selected the caller will be diverted to voicemail.
Click Save settings to update.
Note: You are able to select an option for when you want this function to be active.
Author: Support Last update: 2016-05-28 03:32
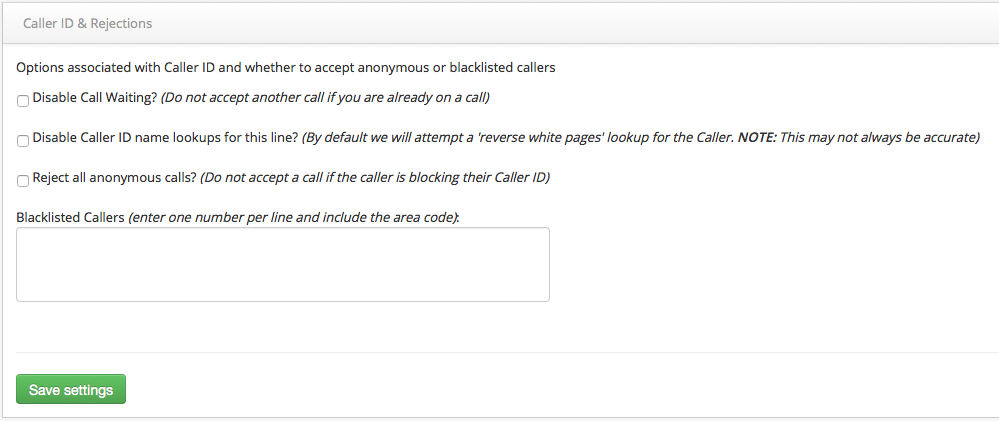
Caller ID and Rejection Options
Caller ID and Call Rejection Options
This feature helps you identify your Inbound caller’s CLI and set any call rejection options.
Quick Guide
Log into https://now.tel2.co.uk> select the number you want to use Caller ID & Rejections.
Select CloudPBX > Inbound Calls > Caller ID & Rejections.
Select the option
Click Save settings to update.
Author: Support Last update: 2016-05-28 03:34
Call Screening
Call Screening Options
We all like a little control over who we take calls from right? We’re used to this on our mobile phones, and call screening is available for you to set up just the way you want in CloudPBX.
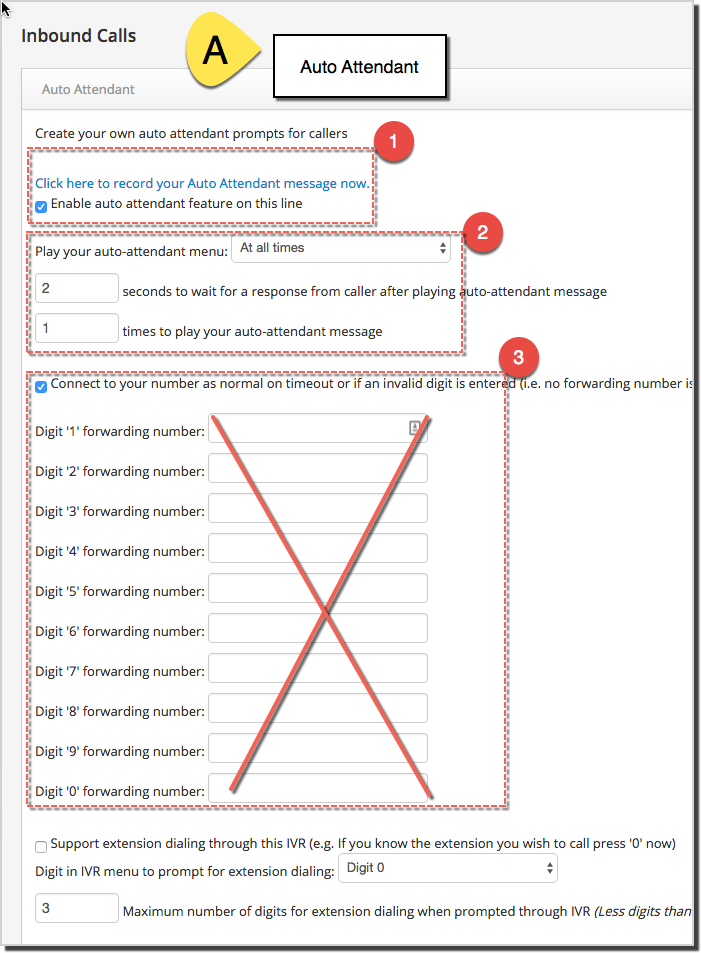
Auto Attendant is your virtual receptionist or IVR, that can greet all inbound calls and direct the caller to the department they requirer. Example: “Welcome to Our Company if you would like to speak to our customer service team press one, accounts press two….”
With Auto Attendant you can:
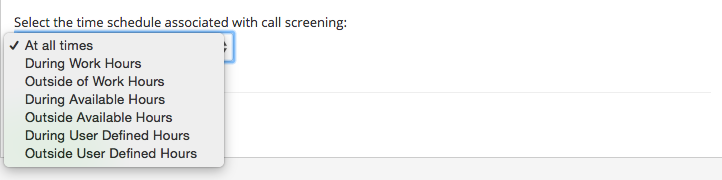
Use time schedules to set when your auto attendant in be active.
Set a time for response time, before the Auto Attend message replays.
Choose how many times to replay Auto Attend message, before the calls get directed to the number Auto Attend is set up on.
Create a greeting only. Limit the Auto Attendant to a greeting message then use the call forward to route the call once the greeting message completes (see simple Quick Guide – Greeting Only).
Quick Guide
Setting up Auto Attendant with Call Fowarding
Log in to your https://now.tel2.co.uk > select number you wish to set up Auto Attendant.
Select Inbound Calls > Auto Attendant.
Either record your Auto Attendant message or upload your recording in Media.
Set your time you want your Auto Attendant play.
Select the numbers you want to use for in your Auto Attendant. Note: If you are planning on using extension think about creating cohesion with your extension dialing numbers.
Click Save settings to update your settings (see Quick Guide – Simple Queue below).
Quick Guide
Setting up Auto Attendant – Greeting Only
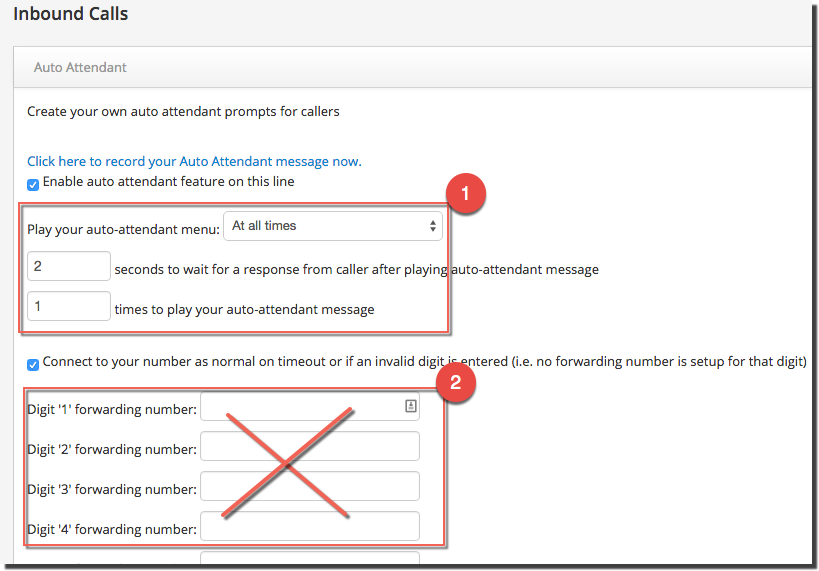
Log in toCloudPBX > select number you wish to set up Auto Attendant
Select Cloud PBX > Inbound Calls > Auto Attendant.
Set your Target numbers and time schedules.
Set Seconds to Wait: 2 Times to play: 1 (see screen shot below)
DO NOT set forwarding numbers within the AutoAttendant (see screen shot below)
Set Call Forward: Use Forwarding and trunking to route the call to the required function (eg Queue or SimRing)
Click Save settings to update your settings.
See also Call Queuing our Auto Attendant solution knowledge base.
Author: Support Last update: 2016-05-28 03:42
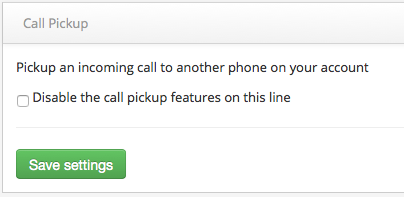
Call Pickup
Call Pickup
The call pickup service allows you to remotely pick up an incoming call to another phone in your group or on your account.
Call pickup functions
*88 – Group pickup. This will pickup the latest incoming call to any of the phones in your group.
*89 – Directed call pickup. This will prompt you for a phone number or extension number in your group and then pickup the incoming call only to that phone.
*89X – You may also dial *89 followed by the phone number or extension without going through the prompt (e.g. *89800 will try to pickup an incoming call to extension 800 in your group).
By default the call pickup service is enabled on all lines, but you may check the box below to disable call pickups both to and from this number so no-one else in your account/group can take your incoming calls.
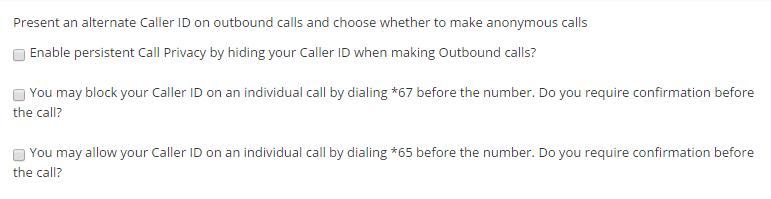
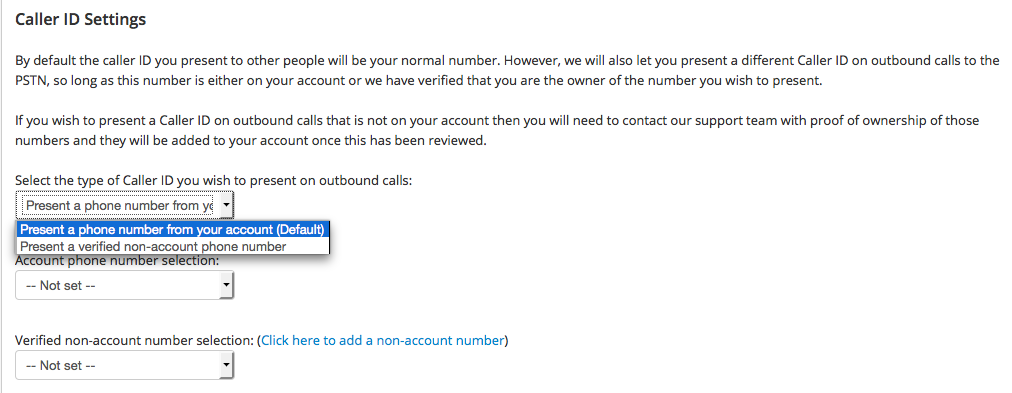
By using our CloudPBX you have the option to show or block your caller ID (also called Calling Line Identification CLI) with your outbound calls.
Quick Guide
Step 1: Set your Caller ID privacy
Log into https://now.tel2.co.uk > select the number you want to set up Caller ID privacy on.
Select CloudPBX > Outbound > Caller ID and Privacy.
Click to select your preferred options.
Select Save settings to update.
Caller ID Settings Options
Use any of your account numbers as the outgoing Caller ID. For example, if your main number is 442034567890 but your users numbers 442034567891, use Select the type of Caller ID to present as 442034567890 as the CLI.
NOTE: If you set a Caller ID to be presented on Outbound Calls then this will force all outgoing calls to use that Caller ID including any diverted/forwarded calls.
NB – In order to present a number that is not on our CloudPBX we need to verify that you are the legal entity and owner of the number you wish to present.
Select CloudPBX > Outbound > caller ID and Privacy
Choose, type of caller ID, number from account or non-acount
Click Save settings to update.
Solution: Multi-business offices
A group of separate company’s lease a shared office that includes an outbound calling on behalf of each tenant. Using the Caller ID function SysAdmin’s can map a receptionist line to show the correct CLI.
For example:
Company A DID is 442034567000
Company B DID is 442034568000
Company C DID is 442034569000
Using the Caller ID feature your CloudPBX you can associate DID lines not on your account which are then displayed as the Caller ID.
Line 1: 442034567001 -> 442034567000
Line 2: 442034568001 -> 442034568000
Line 3: 442034569001 -> 442034569000
Author: Support Last update: 2016-06-02 10:47
PIN Code for Restricting Calls
PIN Code for Restricting Calls
Most organisations have some rules about who can made calls to where. It may be that your warehouse team can only make local and national calls and your accounts team can call local, national and international calls.
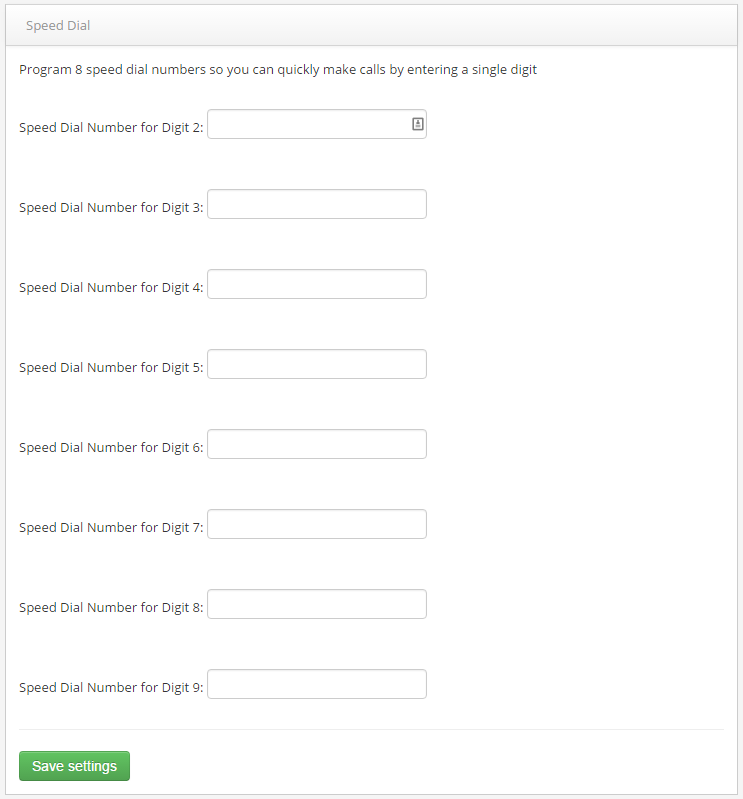
When you have staff, customers and family that you call often, use the CloudPBX speed dial. By using this function you can program in up to 8 of your most called numbers, so you can quickly make a call by dialing a single digit.
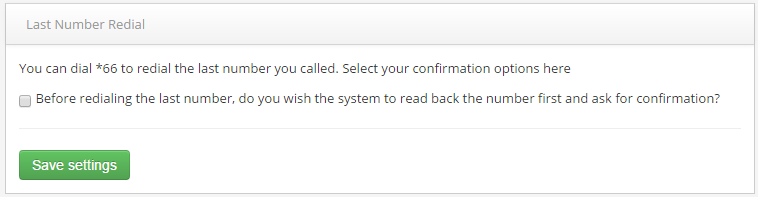
Use last number redial when you are on a call with a customer and the line drops, or you have finished the call and want to quickly call them back *66 will redial the number you last called. You also have the option of having the number read back to you first for confirmation.
Quick Guide
Log into https://now.tel2.co.uk > select the number you want to set up Last Number Redial.
Select CloudPBX > Outbound Calls > Last number redial.
Set your preferences.
Click Save settings to update.
Author: Support Last update: 2016-05-28 04:39
Outbound Trunking
Outbound Trunking
Outbound trunking is a feature that allows you to present other direct dial-in (DDI) numbers as Caller ID on your registered trunk relieving phone administrators the onerous task of individually registering large blocks of numbers to preserve CLI.
The Problem Outbound Trunking Resolves
Using Registration (i.e. not Peering) – system administrators can only present the registered number as the Caller ID which quickly becomes unmanageable for phone administrators managing large number blocks.
Setup outbound trunking
With SIP a Caller ID is made up of 2 parts, the name and number, for example for phone number 442034567890:
“Mike” <sip:442034567890>
After you’ve enabled outbound trunking you can present another number on the account as your Caller ID using the name part of the Caller ID field. In the example below we are presenting the CLI 442034567891 on the registered line 442034567890:
“442034567891” <sip:442034567890>
SIP Peering: One advantage of SIP Peering over Registration is that we honour any account phone numbers (presented via the primary trunk DID) as the outgoing PSTN CLI.
Click Enable outboundtrunking on the line you wish to configure as the accounts Outbound Trunk DID.
Click Save settings to update.
Other Notes
Display name: Most devices such as soft phones and IP Phones refer to the name part as the Display name.
Asterisk based PBX systems the name part can be set in the SIP or IAX2 configuration with the callerid= field – or if you wish to present it in the dial plan then you use the CALLERID (name) variable. By changing this name part to the number you wish to present on the call you can achieve multiple caller ID presentations for each DDI over a single registration or login.
P-Asserted-Identity: see also a P-Asserted-Identity header (RFC 3325) to define the Caller ID as an alternate to manipulating the name field (subject to your system support for RFC 3325).
Author: Support Last update: 2016-05-28 04:42
Presenting Non-Tel2 Numbers for Outbound Calls
Presenting Non-Tel2 Numbers for Outbound Calls
Non-account numbers can be presented on outbound calls, though by default the caller ID is your number supplied by CloudPBX provider. Subject to verification that you are the number(s) owner. To verify a number that was not provided by CloudPBX provider contact your provider, they will link the required numbers to your account.
Select CloudPBX > Outbound Calls > Caller ID & Privacy
Under Caller ID Settings at the bottom of the page you will see a link:
Click on the link and enter your phone number you wish to present as CLI on your account.
Answer the call and enter the PIN number you are presented with to enter followed by the '#' key. If succesful you will need to configure the number per Step 2 below
If you are unable to call the CLI back for some reason then you will need to send us proof of ownership of the number by emailing our support team.
Step 2: Associate the non-Tel2 number
Log into https://now.tel2.co.uk> select the number you want to associate a non-account number with.
Select CloudPBX > Outbound > caller ID and Privacy
Choose from the dropdown Verified non-account selection your non-account number
Select Save
Author: Support Last update: 2016-05-28 04:48
Cloud PBX Features » Advanced Features
Call Recording
Call Recording
On our CloudPBX you can store recorded calls for up to six months. This is great for training purposes or to recorded agreements made over the phone. You can also email each recording to your nominated call recording address. For privacy reasons we disable Call Recording by default.
All persons using this device for recording telephone conversations shall comply with the law. This requires that at least one party to the conversation is to be aware that it is being recorded. If the other party on the call has explicitly instructed that recording be disabled then no recording will be made for either party. In addition, the Principles enumerated in the Privacy Act shall be complied within respect to the nature of the personal information collected, the purpose for the call only.
Unselect Disable ALL call recording features on your number?
Step 2: Recording Options
Select recording option – Record all of my calls / Only record call for selected numbers. If you have chosen selected number, you will need to list the selected numbers you wish to record.
Click Do NOT allow manual recording options during a call if you don’t want this option (it is set as a default once call recoding is unable)
Select which direction to record calls – Record in both directions / Record only Outbound Calls /Record only Inbound Calls
Step 3: Recording Records
Click Send a copy of all recordings to my email.
Nominate an email address to send calls to – if different to the email on the line/account.
Author: Support Last update: 2016-05-28 07:44
Audio Conferencing
Making Conference Calls
When keeping your team connected is important use the CloudPBX Conference Calls function. You can use your CloudPBX number to create your own personalised conference calls. This makes it easy be connected with staff and customers.
Quick Guide
Log intohttps://now.tel2.co.uk> select the number you wish to set up Conference Calling on.
Select CloudPBX > Advanced > Conferencing
Select Conference type.
Choose a pin (if required)
Select conference service option. If you only want to allow chosen numbers to join the conference call, add the numbers in the box.
Select Disable conference recordings if you don’t wish to record the conference call.
Click Save settings to update.
Conference Recordings
Each conference can be automatically recorded and sent to the subscribers default email address as an email with a MP3 file attachment.
In-call functions
Mute/Unmute self
Lock/Unlock room
Eject last user
Increase/Decrease conference volume
Increase/Decrease personal volume
Conference Music on Hold.
The number of participants into your conference bridge is only limited by the number of channels allocated to your account.
Author: Support Last update: 2016-05-30 09:58
Presence and Busy Lamp Field (BLF)
Presence and Busy Lamp Field (BLF)
Click here for a more detailed guide to what BLF (Busy Lamp Field) is and some example configurations for Cisco and Yealink handsets. A more general overview follows below.
This guide applies to the Polycom and Yealink IP handsets.
Enable subscriptions on your line so that others can monitor your line status for Presence and Busy Lamp Field (BLF). This is a two step process by adjusting setting on CloudPBX and your handset.
Add (+) : Name, Last Name (optional), Contact (requires full number including country / area code)
Protocol –> SIP (only for VVX500, 600)
Watch Buddy –> Enable
SAVE
Select contact –> Add to favorites (if you want the contact to appear on the home screen of your keypad).
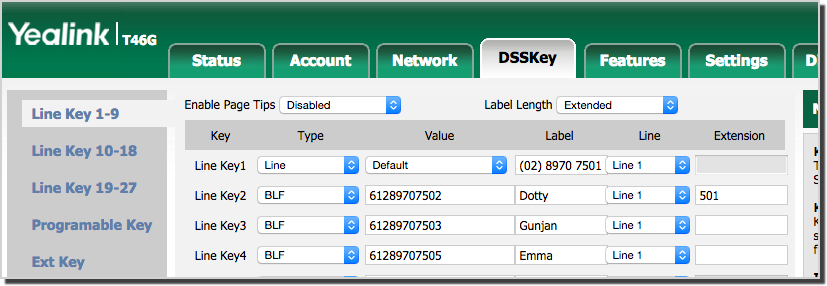
Setting up BLF on your Yealink
Select DSSKey tab
Select the line key you wish to monitor
Set Type to BLF
Set Value to the phone number you wish to monitor NB requires country / area code (e.g. 442034567890)
Click Confirm to save and apply
When configured, the LEDs should light up accordingly on your Yealink.
Green: extension is available. Press BLF key to dial extension.
Red: extension is on a call
Blinking red: extension is receiving a phone call. Press BLF key to perform pick-up.
Author: Support Last update: 2016-05-29 09:48
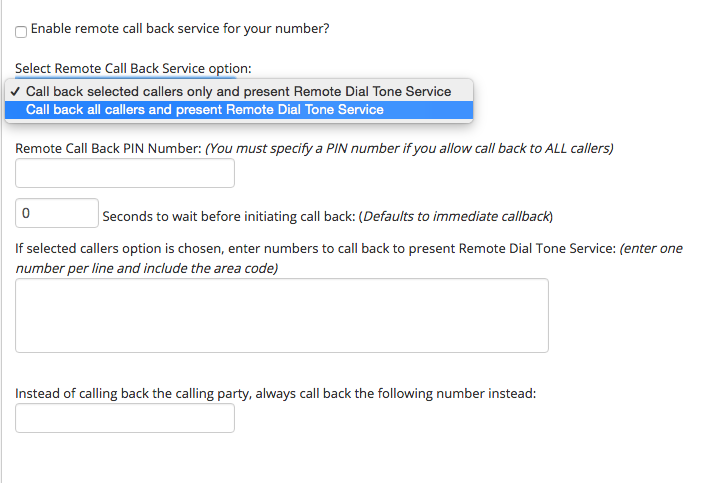
Remote Call Back
Remote Call Back
When you are out of the office and want to make a call to someone who’s number is within your account, simply call the CloudPBX number from any phone. When you hear ringing, hang up and you will be called back – so you can make a call from your CloudPBX account. Call Back is free on all CloudPBX accounts. Calls made to non CloudPBX account numbers are charged as outbound calls.
Select a PIN number if needed. NOTE: PIN numbers are needed if you choose to call back all numbers
Step 2: Using Remote Call Back
Call your CloudPBX number from a phone number chosen.
Hang up when you hear ringing.
CloudPBX will call you back.
Answer the call and then make calls as usual.
NOTE: Off-net calls to call back remote numbers are charged as outbound calls.
Author: Support Last update: 2016-05-28 07:51
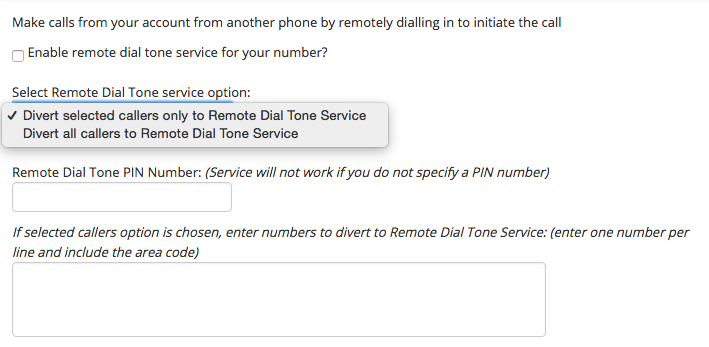
Remote Dial Tone
Remote Dial Tone
When you are out of the office and don’t want to make calls from the phone’s account you have with you, make the call through the CloudPBX account. Meaning the phone’s account you have with you doesn’t pay for the call but the CloudPBX account does. This is great if your overseas so that you don’t need to accrue the international calling rates on your phone.
Call your CloudPBX number with a phone listed for Remote Dial Tone.
Enter your PIN and wait for dial tone
Make calls as usual.
NOTE: Calls made out to remote dial tone numbers are charged as outbound calls. You will need to ensure you have enough calling credit in your account to make the call.
Author: Support Last update: 2016-05-28 07:52
Call Transfers
Call Transfers
By using call transfer you can easily transfer your current caller to another person.Dial #0 for an attended transfer – this is where you can announce the caller and retrieve the call if it is unanswered. Dial ## for a blind transfer – where the call is directly passed through to another person without announcement
Quick Guide
Log into https://now.tel2.co.uk> select the number you want to set up Caller Transfer on.
Select CloudPBX > Advanced > Call Transfers.
Click Enable Presence/BLF on this line only.
Click Save settings to update.
Author: Support Last update: 2016-05-28 07:53
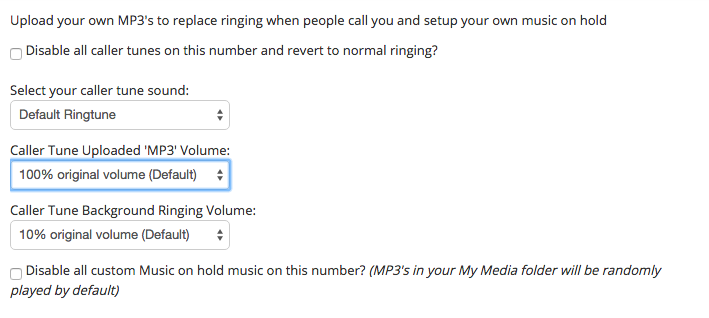
Caller Tunes and Hold Music
Caller Tunes and Hold Music
Long wait times means abandoned calls, lowered customer satisfaction and ultimately lost business. Setting up caller tunes and hold music creates a personable approach to your customers call. Upload your own MP3 files to replace ringing when people call you and setup your own music on hold. There is no additional charge for this service, it is included as part of CloudPBX’s hosted cloud PBX.
Quick Guide
Log into https://now.tel2.co.uk > select the number you want to add caller tunes and hold music to.
Select CloudPBX > Advanced > Caller Tunes & Hold Music.
Select options for caller tune sound and volume.
Click Save settings to update.
Author: Support Last update: 2016-05-28 07:54
Call Parking
Call Parking
Call parking is a feature that allows a person to put a call on hold at one phone and continue the conversation from another phone.
Whilst on a call a person can decide to put that call on hold by transfering the call to *07. The user will then hear a parking extension read back to them (e.g. 700). If your phone does not have an attended transfer button, then you can do this using our inband transfer feature which means dialing #0 during the call followed by *07#. The caller will then be put on hold and hear music on hold until somebody retrieves the call by dialing *1 followed by the parking extension number (e.g. *1 700). Then the parked caller and the new phone will be connected. If the parking times out because nobody has retrieved the call then the parked call will be returned to the person who originally parked the call - or it can also be forwarded to another number if preferred.
Call parking and retrieval can only be done by phones that are on the same account AND in the same group. If you enable call parking on an extension then call parking will become automatically available to all other phones in that group without having to enable the feature on every line.
To park a call transfer the call to: *07 (To park a call to a specific parking extension you can also dial *07xx (e.g. *0705 will park the call on slot 705)
To retrieve a parked call from an extension dial: *1xxx - where xxx is the extension you wish to retrieve (For example to retrieve a call from extensions 705 you would dial *1705. You may also dial *17 and enter the extension after the prompt)
Quick Guide
Log into https://now.tel2.co.uk > select the number you want to set up Caller Parking on.
Select CloudPBX > Advanced > Call Parking.
Click Enable Call Parking and select your settings for parking which will apply to all lines in the same account and group.
Click Save settings to update.
Author: Support Last update: 2016-05-29 04:52
SMS Gateway Instructions
Tel2 offer an SMS gateway for customers who wish to send SMS messages either by using our email to SMS gateway or web service API. Below are instructions on how to use this service.
Email to SMS gateway
1. Firstly you need to setup which email addresses are allowed to send SMS on your account or phone number. To do this login to the Tel2 portal. Click on the 'Cloud PBX' tab at the top of the page and then select the phone number you wish to bill your SMS messages against. Next click on Advanced in the left menu and then select the 'SMS Features' sub-menu option
2. You can list one or many email addresses that are permitted to send SMS through the email gateway, putting each email address on a new line. You can also optionally enter a passphrase to increase security. This passphrase needs to be included in the subject line when sending your SMS emails and will automatically be removed from the SMS when it is sent out.
3. Once you have defined the email addresses allowed to send SMS messages and optionally set a passphrase you can simply send an email from one of those allowed email addresses to a mobile phone number of your choice. The Subject line and Body of the email will be added together to make up the complete SMS message. If you do not want the subject line to be included in the SMS message then leave this blank. You need to send your email message as follows:
The Phone number needs to be in full country code + number format. For example 44777456789 for a UK mobile. 64212345678 for an NZ mobile etc. By default if you exclude the country code and send as 0777456789 for example then we will assume that the UK is the destination for your SMS message. Outside the UK however you will always need to include the country code. To avoid confusion it is best to always include the country code anyway.
For example if you wanted to send and SMS saying "Hello there how are you today?" to a UK mobile number 077723456789 then you would send your email as follows:
SMS messages are restricted in length to 160 characters so you need to ensure the length is less than this limit or it will be trimmed. To send more characters you will need to split up your message into multiple email messages (just like Twitter!)
SMS messages will be automatically billed against your account at the appropriate rates. See our rates page for details on the cost of SMS messages.
SMS API Instructions
Alternatively if you do not wish to use our email gateway to send SMS messages then you can use our SMS API. This is more useful for web developers who wish to build this logic in their own code.
If you have any questions about our SMS API then please contact our support team.
Author: Support Last update: 2018-03-11 21:44
Cloud PBX Features » Preferences
Caller Name Display
Caller Name Display
Using caller name display you can present your user name when you dial another person. This is particular handy when dialing other extensions in your organisation.
Hover over the required line number to expand the line details.
Set your Caller Name.
Navigate to bottom of the page Save to update.
4. Click Save Setting to update.
5. Reset your phone.
Polycom Provisioning
We also use this field to populate the designated name if you are using our Polycom and Yealink provisioning platform.
Author: Support Last update: 2016-05-28 07:56
Extension Dialing
Extension Dialing
Extension dialing works so that you can internally transfer calls to numbers within your account.
They also can work if you set up Auto Attendant for when a customer calls your main number, and then know the extension number of the person they are wanting to reach. Example: “Welcome to Our Company if you know the extension of the person you wish to talk to… ”
Hover over the required line number click on the section you wish to adjust.
Set your extension number. Note: The required extension field length is 3-4 digits.
Navigate to bottom of the page Save to update.
If you are also planning on setting up Auto Attendant think about creating cohesion your extension numbers.
You can also define and limit extension dialling to groups, such as Sales. This will allow the people that are assigned to that group to be able to define their group, if they have access to the PBX.
Select CloudPBX > Preferences > Time login and contact option
Select your time zone.
Click Save settings to update
Author: Support Last update: 2016-05-28 07:59
Time Schedules
Set Up Your Time Schedules
Most organisations shape the way they handle incoming calls to match their hours of operations. In CloudPBX you can define time schedules for; Simultaneous Ring, Call Forwarding and Queuing by customising one the following time schedule types:
Select CloudPBX > Phone number > Preferences > Voice and Quality.
Set preferences
Set Codecs (recommended SysAdmins only)
Set DTMF (recommended SysAdmins only)
Click Save settings to update.
There is also the ability to specify the codecs you wish to support. Tel2 offers :
G.711 a-law codec supported (Excellent quality)
G.711 u-law codec supported (Excellent quality)
G.722 wideband codec supported (The best quality)
GSM codec supported (Good quality)
iLBC codec supported- MUST be 30ms/13.33kbps variant (Good quality)
G.729 codec supported (Good quality)
H.263 video codec supported
H.264 video codec supported
Author: Support Last update: 2016-05-28 08:07
SIP Peering
SIP Peering
SIP Peering (also called SIP Trunking) enables you to statically connect your IP-PBX public interface (WAN IP) with our public IP while we inturn limit access to your nominated static IP.
NB – Peering differs from SIP Registration which relies on an authenticated UserName, Password to connect to our voice proxy.
Once you have enabled SIP Peering we whitelist your WAN IP blocking any other IP from communicating with our Voice service. To harden your public IP address from unauthorised intrusion we advise restricting access to your SIP port to our public IP.
We support two modes of Peering:
Global: All Inbound and Outbound traffic is routed to a single nominated WAN IP
Single: A single DID is linked to your nominated WAN IP
Add Primary Trunk Host IP Address, and failover Trunk IP Address (Note: this is optional)
Exception Route
An Exception Route covers the scenario where you have a main office holding the majority of phone numbers and a regional office with its own WAN IP. The Exception Route is therefore a convenient mechanism that enables you to attach an alternate Peering IP to that the regional office (for example).
Click Peering field for the number you wish to set up
Add Primary Trunk Host IP Address, and failover Trunk IP Address (Note: this is optional)
Author: Support Last update: 2018-01-25 17:16
TCP, TLS and Secure RTP Options
TCP, TLS and Secure RTP Options
We support both TCP (Transmission Control Protocol) and UDP (User Datagram Protocol) communication protocols. While UDP is by far the most common of the two protocols TCP is stated to have advantages.
TCP advantages
Keep Alives: SIP must periodically send out keep-alives to maintain the NAT table entry. The required frequency of keep-alives is much higher for UDP (maybe every 30 seconds) vs TCP (maybe every 15 minutes). While not relevant for small installations TCP has significant advantages within enterprise installations.
TLS: In a security conscious world TCP enables your end points with Transport Layer Security (TLS) which over the separate port 5061 instead of the normal 5060 for UDP.
SRTP (Secure Real-Time Transport Protocol or Secure RTP): SRTP encrypts or “codes” the voice data itself so that no one can understand what is being said except the person who has the decoding “key”, or the person to whom the call is being made. SRTP and SIP TLS encrypt different parts of the VoIP service but together security conscious organisations such as financial or military to use this service.
If you choose to use Secure Encrypted RTP this may cause calls to fail if you have not configured SRTP on your client.
Our fax-mail service allows “approved” email addresses to send faxes via our service. Before you can send or receive faxes follow the Quick Guide below to configure approved senders & receivers.
Fax type: We support PDF, JPEG, Postscript and Tiff attachment formats (sorry no MS Word docs)
Email address: [number]@fax.tel2.co.uk
Confirmation: We will send the approved sender a confirmation (see image below). NB – please allow 5-10 minutes for the confirmation.
If you rely on faxes as part of an emergency service or alternately have a business process dependent on a physical fax machine (for sending or receipt) we recommend retaining your legacy PSTN fax service.
Click on the Fax line number > Faxmail Delivery Options
Select
Specify the email address of approved vfax recipients. Note: Each additional email address must go on a new line.
Click Save settings.
Step 2: Fax Sending Options
Click Faxmail Sending Options
Add and Optional fax verification phase. Approved Faxmail sender (eg reception@mycompany.com.au) can only be associated with a single fax number. This works by specify the alternate fax number/phase in the email Subject field. The Faxmail server will in turn present the specified Subject field fax number as your outgoing fax number. Call it CLI masking for faxing.
Click Save settings to update.
Step 3: Do Not Disturb for Fax
Click Dot Not Disturb for Fax
Click Enable Do not Disturb for Fax Service
OR Click Play a busy tone instead of diverting the caller to Faxmail, By default the fax would be delivered as an email attachment to the assigned email in the delivery option page of faxmail.
A Tel2 vFax number replaces a physical fax machine by using email to send and receive faxes using our fax gateway as a go-between your office and the sending or receiving fax machine.
T.38 Fax protocol explained
Our fax service uses the T.38 protocol to transmit faxes via the public internet. While not quite as reliable as your old PSTN fax service, if you are happy to ditch your old fax machine you’ll find our service successfully communicates 95 of 100 fax transmissions. However, before deciding to go with our fax-mail service you should consider the following scenarios which are known to hinder transmission reliability.
Receipt and Delivery: Ideally we recommend substituting your fax machine with your email client to both send and receive faxes.
High Speed fax: One of the ways t.38 attempts to reduce the jitter or packet loss normally fatal to IP faxing is to reduce the communications speeds down to a 14.4kbps rate. The problem arises with some lower cost fax machines unable to negotiate from 56.6kbps to down to 14.4kbps causing a transmission failure.
Colour fax: At CloudPBX IP faxing is black and white only. While most colour machines will negotiate down to our black and white, some machines can’t negotiate to B&W which will cause transmission failures.
Auto Answer fax machines: We cannot communicate with fax answer machines in answer machine mode. The recipient will need to disable the answer machine to receive the incoming CloudPBX transmission.
If you rely on faxes as part of an emergency service or have a business process dependent on a physical fax machine for both sending and receipt we recommend retaining your legacy PSTN fax service.
Author: Support Last update: 2016-05-28 08:17
vFax and T.38
vFax and T.38
Our vFax service replaces your legacy fax machine by using our fax gateway and your email client for both the sending and receipt of faxes. If your business operates an emergency medical facility or relies on a 100% transmission or receipt accuracy of faxes we advise against using this vFax service.
When a traditional fax is sent (or received) over the PSTN, the recipient machine expects to receive nothing less than100% of the data of the originating fax. The problem for VoIP faxing is contending with data (or packet loss) typically caused by network congestion on the public internet. While email, web browsing or even VoIP phone calls by design can handle some packet loss, faxing isn’t anywhere near as resilient which is why internet engineers invented the T.38 protocol.
The T.38 protocol attempts to remove packet loss by using our fax gateway as an intermediary to keep retransmitting until all data is sent or received. For this reason we say our vFax service is a replacement to your old fax machine as we rely on email to send and receive faxes on your behalf.
CloudPBX Fax numbers
Our dedicated fax lines use the T.38 fax protocol which you can access from our number portal. If you’re porting a fax number from another service you will need to ask us to convert that number into a T.38 fax line by raising a support ticket (support@sipcity.com.au). There’s no cost and it only takes a few minutes for us to convert the number.
Known issues
The following scenarios are known to cause issues:
Machine to machine: Our service is designed to replace your fax machine using your email to send to our fax gateway which in turn sends to our fax gateway for delivery. Where customers send directly between two fax machines they effectively side step our fax mail gateway as the intermediary. In this scenario we loose the resilience of our fax gateway’s send / receive retry buffering.
Dual answer / fax mode: Where the fax machines auto answer the call our fax gateways interprets this as a traditional voice call and will hangup.
High speed fax machines: One technique a t.38 fax gateway deploys to increase reliability is to instruct the recipient machine to adjust its speed (or baud rate) down to the slowest speed of 9600. Machines without the ability to auto adjust have a much higher probability of packet loss and ultimately fax failures.
Color fax machines: Similar to the problem with high speed machines, we cannot receive color faxes.
Author: Support Last update: 2016-05-28 08:18
Cloud PBX Features » Web Conferencing
Web Conferencing
Web Conferencing
Web conferencing lets you meet in real time with anyone, anywhere. Tel2 Web Conferencing combines desktop sharing through a web browser, so everyone sees the same thing while you talk. Letting you collaborate in real time, by using the annotations tools to mark up slides during the meeting.
And the great thing about our web conferencing solution is that its is provided at no extra cost to your standard monthly bill.
The conference moderator will own and manage all parts of the conference. Including inviting conference attendees and ultimately managing the conference itself.
Step 3: Conference Invitee
Our Web Conferencing Solution will manage all invitees to the call, where they can group or privately chat with other invitees of the call. During the call all members of the call are able to view the presenters slides, and view the interaction as the presenters annotates the slides through out the presentation.
Author: Support Last update: 2016-05-28 08:26
Account Management
Account Overview
Account Overview
The account summary dashboard provides a broad overview of your account. In this dashboard you can view account balance, plan details and customer account summary.
Add credit card details or select a saved card in the pop up.
Click Accept to make payment.
Step 2: Account Summary
Log into CloudPBX.
Select Account > Account overview.
Select a month billing cycle to see an overview for that given month.
By selecting either Service type, Billing group or Call date you can view a break down summary of the account.
When in service type by clicking either CallingPlan, Inbound or Number you can view detailed description for that month period.
View the selected months statement by clicking download a pdf or to the statement in a new window.
Author: Support Last update: 2016-05-29 00:18
Managing your Phone Numbers
Manage Phone Numbers
You can view, add and mange your VoIP numbers in CloudPBX settings. Firstly you will need some number on your account, or port your existing numbers over.
Click on one of your numbers and you can access that number’s CloudPBX settings.
Click Remove and you can delete your number.
Note: Think carefully about deleting a number. Once you delete a number it gets removed and quarantined for 6 months.
Author: Support Last update: 2016-05-29 00:18
Fraud Control and Management
How does Tel2 deal with Fraud?
Toll fraud is a potential threat not just for Telcos but all businesses subscribing to a VoIP phone service. While we will quickly disable any suspected toll fraud attempt, like any online service, subscribers are responsible for securing their own systems.
SIP Registration: uses a phone number and password to authenticate (or “register”) your phone onto our service. Always ensure strong passwords, never use passwords like ‘123’, ‘abc’ or ‘password’ as your passwords and finally always ensure your passwords safe storage.
SIP Peering: This method of connection links your public WAN address and our proxy address (phone.tel2.co.uk). Administrators must always confine access to their customers public SIP port to trusted service providers via IP Tables or firewall rules.
Occasionally staff will in error misdial the leading prefix, which our systems identify as potential threat (e.g. Somalia is +252). We are generally quick to identify misdialled prefixes and after speaking directly with account holders will quickly unblock the account. Most customers are happy to put up with this minor inconvenience for the comfort of knowing we are actively monitoring call fraud attempts.
How Fraud works
Overseas calling
Most fraud attempts we see originate from hackers in locations like Russia, Israel and Estonia with the ultimate objective being to find a vulnerable Telco or customer account. Once a vulnerability is identified the end goal is to route calls via the compromised account to regions like Afghanistan, Somalia, Syria etc with the fraudsters magic triangle combining unstable countries with astronomical phone costs and of course a hacked phone number. This is serious business and there is no shortage of disputes between tier one carriers in particular and stunned customers out the door thousands of dollars with the carrier (tier one usually) stubbornly clinging to their strict terms and conditions.
Calling Card operators
On the other side of this fraud are the Calling cards operators offering cheap calling into those very same high cost destinations. Of course somewhere in the middle are our fraudulent hackers selling those very same stolen routes to the calling card middle men always willing to turn a “blind eye” to the truth.
How we block fraud attempts
We monitor every call to all the worlds global hotspots. If for example a call attempt is made to Somalia during the middle of the night, where you’ve never previously called that destination, we will immediately end the call and block all further calls attempts. Behind the scenes we also implement a range of measures to isolate the hacker and their associated proxies.
What should you do to prevent?
Registration: The resolution from your side is usually as simple as changing or providing strong passwords. If your account has been blocked by us for a suspected fraud attempt, we ask you to change your password.
SIP Peering: Administrators must limit all access to their WAN ip including most importantly SIP ports 5060 and port 80 to known service providers (such as us) and system admins.
What happens after we have blocked your account?
We will notify you by email of the international toll block on your account
Immediately the account will have been prevented from making overseas calls. As soon as you have reset the password, or hardened your firewall, we will reenable the account to allow overseas calling.
See also Ghost Calling.
Author: Support Last update: 2016-05-29 00:17
Account History
Account History
You are able to view all invoices online in your account history, making it easy to keep track of your account.
Fill in or update your details. Within this section your have the option to; fill in contact details, billing details, select billing email options and reset account password.
Click Update details to update
Author: Support Last update: 2016-05-29 00:25
Changing your Account Plan
Manage your Account Plan
Location: CloudPBX > Account > Manage Plans
Summary: Manage your monthly plans
Detail: With in the CloudPBX Portal you are able to manage your own plan, plus add additional add-ons to your plan to taylor it to you.
Enter current password | new password (select type required)
Author: Support Last update: 2016-05-29 00:55
Number Porting
How do I move my existing phone number to Tel2?
Number porting – How to move my existing numbers to Tel2
Tel2 supports number porting which means that you can bring your current number with you to use on our network. However we only allow porting of Fixed Line and Tollfree numbers at this stage (i.e. we do not allow porting of Mobile phone numbers). Porting charges apply to each port request that is submitted.
Simple Port: This refers to a single number and can generally be completed within a week so long as the number isn’t part of a larger block of numbers.
Complex Port: More than one number. Complex ports typically take several weeks to process.
Author: Support Last update: 2016-05-29 00:53
Tel2 Applications
Tel2 Softphone Applications
Tel2 Free Apps for iPhone Android, MAC and PC
Tel2's free VoIP softphone apps for iPhone, Android are free to install and is a great addition to your business desktop phone. Whether you are working from home, or traveling overseas, the Tel2 softphone smart phone family is an invaluable tool for mobile workers.
Configuring any new device can be a hassle, even if you know what you’re doing. And while softphones like C-lite and Bria are great tools, they still need to be configured – the correct proxy, port numbers and codecs to use. Our Tel2 softphone family is free to use, and have been pre-configured with all the pieces needed to start making calls. All you do is add your number and password.
Installing Tel2 softphone – iPhone
From iPhone go to iTunes App Store
Search for Tel2 | Download Tel2
Once installed enter your UserName and Password
Installing Tel2 softphone – Android
From Android go to Google Play Store
Search for Tel2 | Download Tel2
Once installed enter your UserName and Password
Voice Quality
There are a couple of known caveats to replacing your deskphone with a softphone, regardless of whether you’ve chosen to use ours or a paid service such as the Bria.
All Softphone share resources with your computer, whereas a deskphone has been optimised just to make calls and therefore do not have to content with any tasks your PC or MAC maybe doing.
Bandwidth: As a rule, your office wireless connection will be more reliable than your phones 3G or 4G service. With 4G in particular, while it has the ability to handle high download speeds, those speeds are accompanied by very high latency often in excess of 200ms and can often have a lot of jitter (latency variation) resulting in poor voice quality.
Author: Support Last update: 2016-05-29 05:38
My DTMF (digits pressed during a call) is not working with the Tel2 Android Application
If you are having problems entering digits during a phone call using the Tel2 Android Softphone Application (e.g. entering a PIN number or selecting an option on an auto attendant etc.) then you can switch the DTMF mode to 'SIP INFO' instead of the default 'RFC2833'. This can often resolve the problem for customers.
To change the DTMF mode in the Android Softphone Application, press the Settings button and then select 'Call' from the settings menu:
Next untick the 'Send RFC2833 DTMFs' check box:
And then tick the 'Send SIP INFO DTMFs' check box instead. Then exit back to the main screen.
Author: Support Last update: 2016-06-16 07:43
Call Initiation Web Service API
Call Initiation Web Service
Tel2 offers customers a way to setup a phone call using a secure web service query. This can be very useful for programmers/developers of custom applications or for call centres etc. who wish to initiate a phone call without having to dial a number through a traditional handset or phone system.
Essentially, the web service query allows any Tel2 customer to setup a call between 2 parties. These parties can be Tel2 phone lines or they can be external phone numbers anywhere in the world. The service works by first dialing the 'A Party' (or User) and then once that call is answered a 2nd call is then setup to the 'B Party' number and when answered the calls are bridged together. Obviously the call will only be successful if the A Party picks up the call first.
The Tel2 account user that authenticates the call will be charged for the 2 legs of the call. If one of those legs is to a Tel2 phone number then there will be no charge on that leg of the call. If both legs of the call are to Tel2 phone numbers then both legs will be free of charge. Tel2 only charges for calls that leave our network to other networks.
user - Tel2 phone number/user that is initiating the call (e.g. 442034567890) password - Tel2 password for that particular phone line (e.g. mypassword) aparty - The phone number you wish to initiate the call from (as you would normally dial the number). If the aparty is ommitted then the 'user' is used as the aparty number. bparty - The phone number you wish to terminate the call to (as you would normally dial the number)
NOTES: 1. The user field *must* be a phone number in the normal login format Tel2 use such as 442034567890. Account numbers are not permitted and other number formats are not supported (such as 02034567890). 2. The password is that loaded against the phone line (not the account) - although the line may share the same password as the account if the line has not been given a serparate password.
3. The aparty and bparty phone numbers should be entered in the normal format you would use to dial a phone number from your handset (e.g. 02034567890 for a domestic UK call or 0012345678910 for an international call)
Examples:
1. Setting up a call between a UK Domestic number and an international number:
If you have any further queries about this service then please contact our support team.
Author: Support Last update: 2016-08-29 11:12
Device Provisioning
Yealink VoIP Phones - Manual Configuration
Yealink – Manually configuring your phone
Quick Guide
Step 1: Browse to Phones Web UI
Phones web UI: to access the phones web UI press the OK button (on right of the keypad) to retrieve the phones IP address.
Enter the IP address in your browser (eg 192.168.1.xx).
UserName and Password: Admin- admin, Password- admin.
Click Confirm.
Step 2: Account Tab
Select Account tab. (or another unused account if Account 1 is in use).
Account Active: On
Label: Name Your Name
Display Name: Displays on your telephone phone screen when idle.
Register Name: Full DID eg 442034567890
User Name: Full DID eg 442034567890
Password: is the password associated with the phone number.
SIP Server: phone.tel2.co.uk
Port: 5060
Transport: TLS.
Voice Mail: *55
NAT Traversal: Disabled
Confirm: to Save
Step 3: Phone Tab
Select Phone Tab
Select Country: United Kingdom
Set Time Zone: +0 UK Primary NTP >> uk.pool.ntp.org (CONFIRM)
DSS Keys: Phone Tab | DSS Key >> use this to assign a variety of standard functions to the T28 10 function keys on the right side of the phone.
At bottom: Select Confirm
Step 4: Date and Time Settings
Time Zone: eg +0 United Kingdom | Location (United Kingdom(London)
Daylight Saving: Automatic
Primary Server: uk.pool.ntp.org
Step 5: Address Books
You can add and manage addresses either via the DSS tab or alternately by importing a variety of format types using the Directory function.
DSS: Using the DSS you can depending on model type configure up to 27 Speed Dials
Directory: The Directory enables you to add via the Web UI directly, import your own XML or CSV lists or finally connect to your LDAP directory source.
Step 6: Bluetooth headsets – T48G
The T48G can be purchased with an optional USB Bluetooth Dongle.
Insert the USB dongle with “TOP” facing upwards into the USB port of the back of the phone
Turn on the Bluetooth headset
Long press the pairing button on your bluetooth headset
Activate the Bluetooth feature on the phone.
Select Scan on the phone
If required enter the PIN 0000 or 1234 to connect the phone and headset
Step 7: Troubleshooting
If the phone icon by your DisplayName is not solid, review User account, password and SIP server settings instructions above.
Ensure SIP ALG is disabled on your router.
Ensure STUN is Off or any NAT traversal settings
Step 7: Busy Lamp Field (BLF)
If required you can see our BLF User Guide.
Yealink – Diagnostics/Troubleshooting
To assist us troubleshoot configuration issues with Yealink phones we require Syslog, SIP trace and configuration data from your Yealink handset.
Quick Guide
Step 1: Browse to Phones Web UI
Phones web UI: to access the phones web UI press the OK button (on right of the keypad) to retrieve the phones IP address.
Enter the IP address in your browser (eg 192.168.1.xx).
UserName and Password: Admin- admin, Password- admin.
Click Confirm.
Step 2: Settings Tab
Select Settings tab >> Configuration
Export System Log: Set the Syslog level to 6 -> reboot the phone
Pcap Feature: Start to capture the Trace -> reproduce your issue -> stop capturing the Trace -> Export PCAP Trace
Export or Import Configuration: Export config.bin
Email Download files to our support site.
Author: Support Last update: 2016-05-29 08:25
Polycom VVX IP Phones – Manual Configuration
Polycom VVX IP Phones – Manual Configuration
Customise the following features on your Polycom VVX handsets.
This knowledge base applies for subscribers not using our automated device provisioning.
Retrieve the handset IP address: Home (Button) > Settings > 4. Status > 2. Network > 1. TPC/IP
Web UI: Enter IP address (eg 192.168.1.11) into browser
Settings > Lines (select Line)
Follow instructions in Fig below
SIP Protocol: Enable
Identification: Display Name, Address (must be full DID), Label (usually same as Display Name)
Authentication: User ID (full DID), Password, Disable Credentials
SIP Server 1: phone.tel2.co.uk, Expires 180
2. Changing the Handset label
By default the our provisioning system sets the Display Name, Address and phone Label with the default phone number. You can change the phone label to an Alpha name e.g. Mike, which is handy particularly for phones configured with multiple lines.
Retrieve the handset IP address: Home (Button) > Settings > 4. Status > 2. Network > 1. TPC/IP
Web UI: Enter IP address (eg 192.168.1.11) into browser
Settings > Lines (select Line)
Identification: change Label (see Fig 1 below)
3. Extension dialling
Set your preferred a line extension (eg reduce 442034567890 to 890) allowing coworkers to call you using your preferred three or four digit number.
4. Handset Volume
You may have noticed that the Polycom handset volume is a little low. But secondly, while you can increase volume using the handset volume button, each time you pick up the phone for another call it annoyingly resets to the factory default. The problem is US telecommunications regs require all US vendors to reset handset volumes to the defaults at the end of each call.
If using you are using our Polycom provisioning we have disabled the reset function to persist your handset volume.
5. Upgrading Firmware
While all Polycom VVX phones supplied by SIPcity ship with the latest firmware, new phones purchased through other channels will probably require a firmware upgrade.
If you wish to leverage our Polycom provisioning system with legacy IP phones (firmware 3.3.xx or older) you will first need to upgrade the phones firmware as the older Polycoms don’t support web based auto-provisioning. Secondly, depending on model, you may have to complete a two step firmware upgrade to achieve the minimum 4.1.1 software supporting our web based auto-provisioning.
Enable Radio: Menu > Settings > 1. Basic Settings > 11. Bluetooth Settings >> Enable Radio ON
Headset: Place your headset in in pairing.
To Pair: Press the Bluetooth symbol (see screenshot below) to take you back to Bluetooth Settings.
Select Manage BT Headset – Select Scan then select the required headset.
8. Accessing Voicemail from a Polycom handset
If you have a CloudPBX provisioned Polycom handset Voicemails can be retrieved by selecting the “Messages” button on your handset.
Select Messages key
Select 1 “New Messages” THEN
4 – previous message
5 – Repeat
6 – Play next message
7 – Delete
8 – Forward
9 – SAVE
On the VVX300 Messages is a physical button adjacent the 7 key.
On the VVX500/600 you will find messages as a soft key in the top left of your screen.
Author: Support Last update: 2016-05-29 08:14
Yealink W52P DECT VoIP Phones - Manual Configuration
Yealink W52P DECT VoIP Phones – Manual Configuration
Quick Guide
Step 1: Base Station
The W52P base station can be powered by the supplied 120/240v adaptor or alternately from a POE switch.
Install the 2 x AAA rechargeable batteries into the handset (and recharge if required).
Enter the IP address in your browser (eg 192.168.1.xx).
To find the base station web UI IP address press the front button on the base station to communicate its IP address to the handset.
UserName and Password: Admin- admin, Password- admin
Click Confirm
Step 2: Account Tab
Select Account tab. (or another unused account if Account 1 is in use).
Account Active: On
Label: Name Your Name
Display Name: Displays on your telephone phone screen when idle.
Register Name: Full DID eg 442034567890
User Name: Full DID eg 442034567890
Password: is the password associated with the phone number.
Enable Outbound Proxy: Disabled
Transport: TLS preferred (or UDP)
SIP Server 1: phone.tel2.co.uk
Port: 5060
Server Expires: 180
Voice Mail: *55
NAT Traversal: Disabled
Confirm: to Save
Step 3: Phone Tab
Select Phone Tab
Select Country: Australia
Set Time Zone: +0 United Kingdom Primary NTP >> uk.pool.ntp.org (CONFIRM)
DSS Keys: Phone Tab | DSS Key >> use this to assign a variety of standard functions to the T28 10 function keys on the right side of the phone.
At bottom: Select Confirm
Step 4: Date and Time Settings
Time Zone: eg +0 United Kingdom | Location: United Kingdom(London)
Daylight Saving: Automatic
Location: eg United Kingdom (London)
Fixed Type: By Week
Primary Server: uk.pool.ntp.org
Step 5: Contacts
Contacts can be imported into the W52P from either as XML or CSV imports.
File Template: To access either XML or CSV download the file template
Import Contacts: Edit the file and import.
Handset: To access your imported contacts list select the DOWN arrow on the phones OK menu
Author: Support Last update: 2016-05-30 09:46
Cisco SPA Phones – Manual Configuration
Cisco SPA Phones– Manual Configuration
This knowledge base applies to phone admin manually configuring any of the Cisco SPA family of phones.
Quick Guide to Cisco SPA
Step One: Cisco SPA web UI
Retrieve the phones IP address > select the Settings button (page icon)
SPA 504 select Option 9 | Network >> Current IP.
SPA 525 select Settings | Status | Network Status >>IP Address.
Advanced settings: type admin/advanced to jump directly into the phone full admin access (see screen shot below).
Step Two: SIP Tab
Browse to the SIP Tab (see screen shot below).
SIP Timer Values: Set INVITE Expires to 240 and Reg Max Expires 600.NB – while our recommended settings for both are arbitrary, its important that you reduce them from the factory defaults of 3600 seconds which is way too long.
Step Three: Ext 1 Tab
You will use the Ext tabs to program each numbers (or extensions) onto your Cisco SPA handset.
Disabling unused Extensions
By default all Extension tabs are enabled on the Cisco SPA phones with the annoying consequence that the single number programmed against Ext 1 will populate across all other extension buttons on your handset (see example below). To prevent this behaviour simply disable any used Extensions.
3.1 SIP Settings
SIP Transport: TLS (if using UDP please use port 5060)
SIP Port: 5061 (UDP 5060)
3.2 Proxy and Registration
Proxy: phone.tel2.co..uk
Outbound Proxy: phone.tel2.co..uk
Author: Support Last update: 2016-05-29 08:21
Gigaset Cordless IP Phones - Manual Configuration
Gigaset Cordless IP Phones - Manual Configuration
This KB is limited to the Gigaset family of cordless (DECT) handsets.
Configuring the phone via the Web configurator
We recommend using the base stations web user interface to configure each handset.
Establish the telephone’s current IP address on the handset
Control button on right side of handset
Settings (spanner icon)
Registration
Enter http:// and the telephone’s current IP address (for example: http://192.168.2.2) into the address field of the Web browser.
Press the return key.
A connection is established to the phone’s Web configurator.
User name: <your phone number> (e.g. 442034567890)
General Provider Data
Domain: phone.tel2.co.uk
Proxy server Port: 5060
Register server: phone.tel2.co.uk
Refresh Registration: 180 seconds
Save settings: SET
NB – the Gigaset are typically slow to acknowledge the handsets registration and can take 30 seconds to change status to Registered.
Author: Support Last update: 2016-05-29 08:24
Asterisk Based PBX Systems (including FreePBX, Trixbox, Elastix and other variants)
Tel2 are passionate about Asterisk, Freeswitch and other open source initiatives. So much so that we use open source products throughout our own network. By embracing open source initiatives we believe this gives us a unique opportunity to give something back to the community, keep our costs low and stay one step ahead of our competitors through contant innovation and the development of smart intuitive features.
At a basic level to get Zoiper to register to our platform open the Preferences and click on Accounts. Then the settings you will need to enter will be:
The above settings should be enough to get you registered and making calls with Tel2. There are of course many other settings you may wish to edit such as codec settings etc. but these are beyond the scope of this article. If you have any further queries then contact our support team.
Below is a screenshot (from the Mac client) showing an example configuration for a Zoiper client:
Author: Support Last update: 2016-06-29 05:49
Configuring the Zoiper Smartphone App to work with Tel2
If you are having issues using our Tel2 Smartphone Apps on your Apple iPhone or Android based phone then there is an alternative Phone Application that you can use to connect to our service called 'Zoiper'. In your App Store or Play Store search for 'Zoiper' and you can download the free version of the App or click on the links below:
Here are the steps to configure Zoiper to connect to Tel2:
1. Open the App and when the main dialpad screen appears click on 'Config' in the top right corner, then Accounts.
2. Press 'Add account' and click 'Yes' to the 'Do you already have an account' question and then click 'Manual configuration' for the Account Setup question.
3. Select 'SIP' as the account type
4. Click on Account name and set this to 'Tel2'
5. Click on Host and set this to 'phone.tel2.co.uk'
6. Click on Username and enter your Tel2 phone number (e.g. 442034567890)
7. Click on Password and enter your Tel2 password entered when you signed up
8. Scroll down to the bottom of the page and select 'Network Settings' and then on the next page select 'Transport Type' and select 'TLS'
9. Now go back to the main screen and your phone should show a green tick for the Tel2 account and state the Account is ready. You can now go back to the Dialpad and start making calls.
If you have any further issues with the setup or App then please contact our Support team
Author: Support Last update: 2017-04-25 16:35
Support
How do I get an answer to a support query with Tel2?
Step 1: Search our Knowledge Base/FAQ Site
Before you log a ticket or call us we advise you search our FAQ site at http://faq.tel2.co.uk to see if you can find an answer to your question first in our knowledge base. Click on the 'Search...' field and type some keywords (e.g. Asterisk, Porting etc.) and see what results (if any) are returned and review these pages
Step 2: Log a ticket with our support team
If you were unable to find an answer to your question in our FAQ pages then you can log a support ticket with our team. To do this login to https://now.tel2.co.uk with your account number and password and then click on the 'Support' tab along the top menu. This should bring up the ticketing system. Fill in the form, selecting the To: queue and information that will help us resolve your problem.
If you are logging a ticket relating to a phone call please send us details relating to that call as way of an example including the calling number, called number, date and time and what (if any) error messages or responses were heard or seen on your phone screen.
If you are logging a ticket relating to being unable to login or setup your phone to connect to Tel2 then please send us full details of your phone device make/model and firmware version along with screenshots of your configuration screens. Also tell us the make and model of any routers or firewalls connecting your phone to the Internet.
The more information you can supply in the initial ticket you log with us - the faster we can resolve your problem!
Step 3: Contact our support team by email or phone
If you have not received a timely response to your support ticket (usually we respond within 1 business day) - or your query is of a critical or urgent nature then you can contact us directly in one of the following ways:
Tel2 is an Internet delivered phone service. We do not supply traditional phone lines to your home like BT. You will need a broadband internet connection, 4G or Wifi to use our services. We recommend customers use the Tel2 Applications to connect to our service if they do not already have their own SIP (VOIP) enabled phone, device or PBX. These applications run on iPhone, iPad, Android phones and tablets as well as Windows or MAC operating systems.
If customers do not want to use software on their Smartphone or PC to make calls then you can also buy a hardware phone that is SIP Compliant. We recommend Yealink, Cisco and Polycom handsets for this. Please contact sales@tel2.co.uk if you require assistance selecting a physical handset/solution.
Author: Support Last update: 2016-05-29 09:36
How do I connect a PBX to Tel2?
PBX Systems
Customers can also connect to Tel2 using their own IP-PBX which is SIP capable and compatible. Asterisk (and it's variants such as FreePBX, Trixbox and others) is the most popular PBX in the market and instructions can be found here on how to connect Asterisk based systems to our service.
Contact us if you have another PBX phone system and want to see if this is compatible with our services.
Author: Support Last update: 2016-05-29 09:37
How do I become a Tel2 Agent or Reseller?
Become an authorised reseller of the Tel2 retail solutions including our SIP and IAX2 Trunking and Cloud PBX services and receive generous ongoing commissions.
You can contact us using the online contact form at https://tel2.co.uk/contactform.php and a member of our sales team will be back in contact with you very shortly.
Author: Support Last update: 2016-05-29 09:53
How do I become a Wholesale customer of Tel2?
Designed to help you grow your business and increase efficiency our wholesale and carrier services are extremely competitive and rich in features. Choose between traditional wholesale and our My Cloud Telco white label solution that offers a fully branded telco with billing, customer and management portals.
You can contact us using the online contact form at https://tel2.co.uk/contactform.php and a member of our sales team will be back in contact with you very shortly.
Author: Support Last update: 2016-05-29 09:55
An Invitation to Join our Database of Skilled IP Telephony Agents
Hi there,
My name is Samantha and I am the General Manager at Tel2. We're on the hunt for partners across the UK to add to our database of skilled specialists and resellers to assist us with on-premise client installations and offer professional assistance for our client base and think that your company might fit the bill.
The Tel2 engagement model ranges from generous commission based agent agreements to white label service provider or traditional wholesale - we'll work with you to figure out which model best suits your business structure and enhance your product portfolios and maximise your returns.
You can Register with us today or just drop me an email and let us know if you are able to assist and help us deliver awesome Voice solutions to UK Businesses in your area.
Tel2 are a hosted IP telephony provider based in the UK. We are passionate about IP telephony and have a 25 year history in Telecommunications. This includes developing our own award winning hosted voice offering 12 years ago in Australasia, the US and more recently the UK. The solution we offer includes a comprehensive range of Cloud Features including Auto Attendant, Call Forwarding, Call Recording, Faxmail, Advanced Voicemail, Web/Video and Audio Conferencing and much more. We also offer more traditional SIP trunking, International numbers and voice termination through our 150+ global interconnects.
This guide does not explain how to setup Microsoft Teams. The assumption is that you already have a Teams environment with Microsoft, your own domain(s) and users setup and this guide is focussed purely on how to connect with that environment to provide incoming and outgoing calls to the PSTN along with providing phone numbers to your end users.
If you would like some guides on getting Microsoft Teams setup for your business then follow the useful links below:
Microsoft Licenses Required for Phone System Integration
To enable Phone services for Microsoft Teams you need to have a 'phone system license' for each of your users that wish to have this functionality. Here is a useful guide to licensing:
In the Enterprise space you can add either an E1, E3 or E5 license for a user and this will give you the functionality you need to enable phone services for that user. You can also look at adding a phone system license 'Add-on' to give you this functionality if this is available on your current Office 365 license.
Step by Step Example Guide
Every customer is different when it comes to Teams Integration so there is no 'one guide suits all' for getting setup with Teams. However, we decided to put together a step by step guide for a 'vanilla' customer who is new to Teams and looking to signup to Teams with 3 users and then map 3 phone lines to those users. The guide below is a record of that process with detailed screenshots and could be useful for system integrators to see the steps involved in a 'new' install.
Assuming you already have your own domain setup with Microsoft you now need to setup our Teams SBC domain and get this verified. If you have not set up any domain yet with Microsoft for your organisation then please see our-by-step guide for this above.
First you need to login to login to the Microsoft Admin Center using your Microsoft Login:
In the customer portal click on the Voice tab and then select 'Profiles' from the left side menu.
If you want to setup all lines on your account to use Microsoft Teams use the default profile otherwise you can create a new profile at the bottom of the page. In the drop down menu for Connection type select 'Microsoft Teams'.
Copy the Microsoft Teams Domain into your clipboard (it will be something like ms6xxxxxxx.sbc.msteams.uk)
In the Domains page back in the Admin Center (under Settings/Domains) click 'Add domain'
Enter the Teams Domain you copied into your clipboard into the domain text box and click Next
Wait for the Verify Domain page to load (this can take some time and you may need to refresh the page)
The Verify domain page should now be displayed
Copy the TXT value by clicking the icon beside the TXT value information (e.g. MS=msxxxxxxxx)
Now switch back to the customer portal page and paste this value into the Domain TXT record value field and then press 'Save Default Profile'
Now switch back to the Admin Center page and click on 'Verify'
You may need to wait 1 minute or retry if this fails. Be patient! Once verified make sure all the options for online services are NOT ticked and click Next.
All being well this should complete and your trunking domain will be added to your account.
Now switch to the 'Users' tab in the Admin Center and click 'Add a user'
We are going to create a 'temporary user' to associate with the trunk domain
The user details should be something like 'VOIP Trunk' and username of 'voiptrunk'. Make sure you select our new VOIP trunk domain from the drop down menu (e.g. msxxxxxxxx.sbc.msteams.uk). Then Click Next.
Now you need to assign a product license that includes phone services such as an E5 or E3 license to this user. If you only don't have any more licenses available then you may need to 'borrow' one from one of your other users temporarily. We can assign it back later on once the trunk is setup.
Leave the Role and Profile Info as default and click Next
Press 'Finish Adding'
You should receive confirmation the Trunk user has been created.
Go back to your Active users in the Users tab in Admin Center and the Trunk User should be listed.
User Management
Now switch back to your customer portal tab and add any new numbers you want on teams. You can also port a number to us or change an existing line type to be a Teams line in the Account/Numbers page.
For adding a new Teams number ensure you select the Line Type as 'Microsoft Teams' and select a Teams plan for the line.
Continue to add Teams enabled numbers to your Hero account as required.
Click on 'Voice' tab and your Teams users should be listed with a 'Teams icon' beside them. If you do not see this icon check that you have set the Profile (in the Profiles Page) to be of the type 'Microsoft Teams' and if you have created a new profile for Teams then in the numbers page make sure you assign that profile to the Teams lines.
Now click on the 'Teams' page on the left menu
Fill in the fields against each teams number including the teams user IDs hosted in Office 365 (including the domain name e.g. Joe@herointernet.nz). You can also decide if you want to twin with a regular SIP phone or have the call failover to SIP or be hosted on Teams only. You can also decide if you want to use the Teams Voicemail system or the Hero voicemail and provide an 'offline forwarding number' for your users in case calls fail to Teams and you need to have a backup number for these users (e.g. their mobile phone number). Press 'Save Changes' when done.
The following steps are for Advanced users only who understand how to use the Microsoft Power Shell. Click on 'Power Shell' to display a list of commands you need to enter.
The final stages require a good technical knowledge of Microsoft's Admin Center and Power Shell command line to complete the integration. You will likely need an authorised Microsoft Office 365 Reseller to complete the final steps.
Power Shell Setup and Commands
You will need the Skype for Business Powershell environment installed before you can run the Powershell commands later in the guide:
Follow the guides below for instructions on how to setup Skype for Business and Windows Powershell
We now need to map your phone number(s) to your Microsoft Teams users.
Open up the Microsoft Power shell and start a session under your domain/user. The following example assumes that your username is Joe@herointernet.nz by way of example:
1. Establishing Your Session
The format for this command is similar to the below commands (where User@yourdomain.onmicrosoft.com would be replaced with your own administrator login details you use to manage your Microsoft Office 365 account)
You should now be logged into a new session in the Power Shell and can start executing commands
2. For Each Domain (Tenant) in Teams
Run the following power shell commands for each of your tenants in Microsoft Teams. The example below the example domain is "ms81012345.sbc.msteams.uk" (replace this with your own domain) and we have named the Voice Identity as 'VOIP'. These commands are given to you in the Power Shell page in the hero portal so you should be able to just paste them in.
The first command you need to run is the Set-CsUser command and this adds the first user to the trunk (NOTE: this needs to be done BEFORE creating the Voice Route and Policy) and will look something like:
Next paste the other tenant commands to setup the PSTN identity and Voice route details and then assign the calling and voice routing policy to your first user. This should look something like:
If you have more than a single user then you will need to now map a phone number to each of your Teams users using the following commands. The example below assumes that our example user Joe@herointernet.nz is going to be assigned the phone number 442034567890 (added to Microsoft with the full country code format as +442034567890) and we are still using the Identity of "VOIP". Replace these as required for your own circumstances.
If your company is currently using Skype for Business, you have to upgrade to Teams and enable the Phone System feature. This process requires a bit of prior planning, so check out the Microsoft articles for more information.
If you are using Skype for Business, this will help you: